OS X

Network Utility in OS X 10.9 Mavericks

In OS X 10.9 Mavericks the very useful Network Utility app has been moved from its previous location in //Utilities to /System/Library/CoreServices/Applications. You can activate it by navigating to that folder and simply opening it as normal.

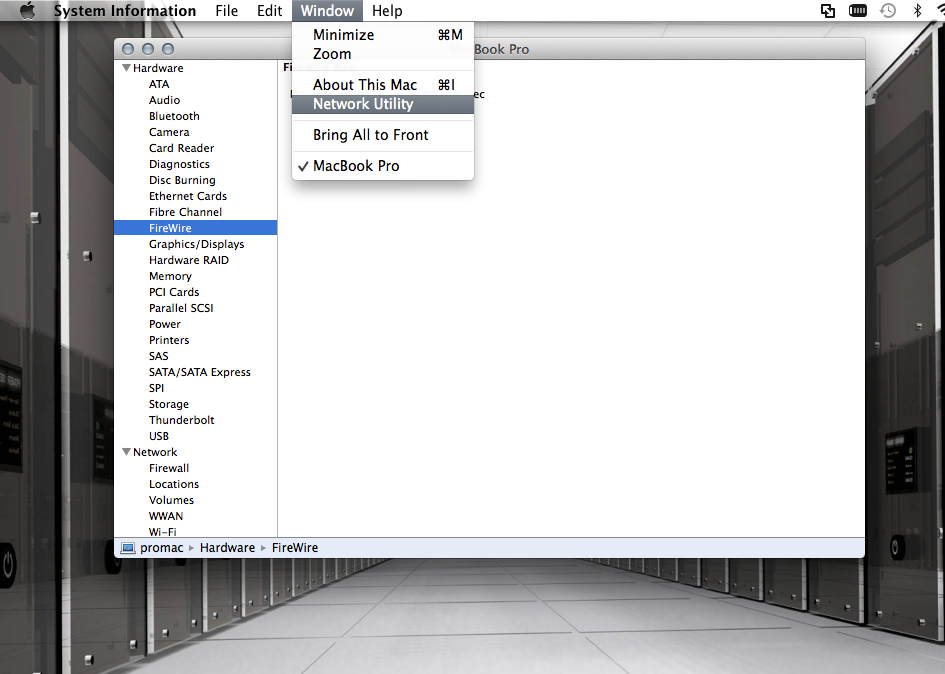
There is also another way to activate Network Utility. Simply open up the ‘System Information’ app, which can still be found in Applications/Utilities, then in the menus at the top of the screen open up the ‘Window’ menu and select ‘Network Utility’.


mavnetutil-1024x753

Upgrade OS X
Macs know how to take care of themselves. Having the latestversion of OS X is good practice. Don’t think of it as adding morejunk to your Mac. Think of it as new software that makes your Mac
run more smoothly. So, the first step in speeding up your Mac is,naturally, to update your Mac. OS X Mavericks has just been released. It should definitely help you add some speed to your Mac. If you’d like to learn how to install OS X Mavericks, take a look at our article on how to do so.
OS X running slow
Manage Startup
Get your Mac up and running with a clean start. Imagine that you start running a race with an 80-pound backpack. It’s going to take you a bit longer to get moving, right? Lighten the load on you Mac. Get a fast Mac startup by removing unnecessary apps. Go to your System Preferences > Users & Groups, and then click on your username. Now click on Login Items and check the box of each program you don’t immediately need when your Mac starts up. This should help out a ton. Now, we’re two steps closer to a newer, faster Mac. mac Startup speed up
Activity Monitor
One of the easiest ways to take back control of your slow Mac is to check your Activity Monitor. Quitting a single app could make a huge difference in speeding up your slow Mac. Open up your Applications folder and then your Utilities folder. Here you’ll find the Activity Monitor, open it. Check out the list of apps and processes that are going on inside your Mac. Pretty complex, eh? We want to find out what’s causing your Mac trouble. Click on the %CPU filter at the top of the list. This sorts the programs by the amount of space they’re taking up on your Mac RAM. The higher the number, the harder you can grind your teeth at that app. Remove, for example, iTunes or maybe Safari (especially if you’re
using Chrome) by clicking on the app from the list and then clicking Quit Process, located at the top-left corner of the window. Don’t remove anything you don’t know, or, if you do, make sure to look up what it is that you’re removing before doing so.
mac Activity Monitor speed up
Hardware Upgrade
So, you’ve tried the above and you still want to make your slow Mac faster? Look into upgrading your hardware. Unfortunately, this can be a bit pricey and some Macs are beyond help (kidding; some just can’t be upgraded). Check out this guide that discusses diagnosing your Mac and what is available in terms of hardware upgrades. Cost and time will be a major factor in deciding if this is the way to go. It should be noted that this might just be the best way to fix your slow Mac. mac Hardware Upgrade
Hard Drive Cleanup
The most well-rounded option for Mac users is to clean out your hard drive. The problem is knowing what files to delete and how to completely remove them from your Mac. The best way to do this? CleanMyMac 2. CleanMyMac 2 takes the guesswork out of cleaning. It gives your Mac a complete scrub down by removing apps, data, and other unnecessary junk. With its Automatic Cleanup function, you can clean your Mac in just two clicks; click to scan, click to remove. Done. It removes caches, logs, language packs, and more to help speed up your Mac.

The Best Cleaner for Mac: CleanMyMac 2

Download for Free


mac Hard Drive Cleanup and speed up

Mac OSX Stuck At Boot with Spinning Wheel: PERMISSIONS ERROR, esp. ACL

Symptoms:

Your Mac is stuck at boot time. You’ve got a spinning wheel and it just sits there.

Maybe you remember messing about with permissions recently? Perhaps ACLs?

You can screw it up all sorts of ways – maybe you were messing about with chown or chmod, or maybe you did the big dumb and propagated across your boot volume using the OSX Server tools.

Here is the answer: first, find a terminal window or COMMAND-S boot into Single User Mode & mount. Then get into root by typing “su”. If you don’t know the password, then type “sudo passwd” enter your password, and then it will prompt you to set the root password. THEN:

“chmod -R -N /Volumes”

Removes all ACLs from everything.

now it works!!!


Heres the orginial post:


Fire up in Verbose Mode (APPLE KEY + V) and you will see

BootCacheControlUnable to open /var/db/BootCache.playlist

and

launch_msg(): Socket is not connected

Looking inside the folfer at /var/db reveals there is indeed no BootCache Playlist. What is a BootCache Playlist anyways?

Mac OS X uses a boot-time optimization (effectively a smart read-ahead) that monitors the pattern of incoming read requests to a block device (the boot disk), and sorts the pattern into a “playlist”, which is used to cluster reads into a private cache. This “boot cache” is then used for satisfying incoming read requests, if possible. The scheme also measures the cache hit rate, and stores the request pattern into a “history list” for being adaptive in future. If the hit rate is too low, the caching is disabled.

The loadable (sorted) read pattern is stored in/var/db/BootCache.playlist. Once this pattern is loaded, the cache comes into effect. The entire process is invisible from users.

This feature is only supported on the root device. Further, it requires at least128 MB of physical RAM before it is enabled (automatically).

/System/Library/Extensions/BootCache.kext is the location of the kernel extension implementing the cache whileContents/Resources/BootCacheControl within that directory is the user-level control utility (it lets you load the playlist, among other things)

BootCache is started (via BootCacheControl, the control utility) in/etc/rc, and a prefetch tag is inserted (unless the system is booting in safe mode).

/etc/rc looks for BootCacheControl in the Resources directory of theBootCache.kext bundle, as well as in /usr/sbin, and finds it in the former (but it doesn’t exist in the latter)


1) I tried to repair the filesystem with fsck. Nothing is wrong though

2)  I got advice to run:

/System/Library/Frameworks/CoreServices.framework/Versions/A/Frameworks/LaunchS ervices.framework/Versions/A/Support/lsregister -kill -r -domain local -domain system -domain user

to reset the Launch Services database, but that doesn’t seem to do anything (and I’m not sure what that does in first place).

3) Logged in by holding Option and selecting Recovery drive. Disk Utility -> verify/repair permissions. verify/repair file system. To no avail.

4) Tried a few things using hte BootCacheControl command, like tag, mount, and

bootcachecontrol -f /var/db/bootcache.playlist generate /dev/rdisk0s2

Nothing. tried to start with -f /var/.. and it gave the same startup error, file now found, so I tried to “touch /var/db/bootcache.playlist” and got an improper header error when attempting to
How to install AirPort Utility 5.6.1 on Mountain Lion

Just in case you’d like to use AirPort Utility 5.6.1 on Mountain Lion (and probalby Lion as well), here’s how to install it:

1. Download the disk image (its here: http://support.apple.com/kb/DL1536).

2. Mount the disk image and drag the install package (AirPortUtility.pkg) to your desktop.

3. Fire up Terminal and prepare to show off…

4. Make a temporary directory and cd into it: mkdir tmp ; cd tmp

5. Extract the Payload file from the install package with xar, here’s the command: xar -x -f ~/Desktop/AirPortUtility.pkg Payload

6. The result will be a directory named AirPortUtility.pkg (just like the file, but now you can move into it to get the files you want). Inside will be a file called Payload that is a compressed archive of AirPort Utility.app.

7. So our next move is to extract the app. Here’s the command: gzcat AirPortUtility.pkg/Payload | tar -xf –

8. When it finished there will be three new folders Applications, Library, and System. Your nice new copy of AirPort Utility 5.6.1 will be in the Utilities folder inside of the Applications folder. Use Finder to rename it (assuming you want to keep version 6 as well) then drag it to your Applications/Utilities folder.

9. The other two folders hold the AirPort Base Station Agent and its supporting files. I’m not sure if you need/want these or not. As best I can figure the agent does two things: it checks for updates for AirPort Utility and it monitors AirPort base stations for problems. You probably already have a version running as it comes with the system and it seems to know how to talk to both versions of AirPort Utility (I got nagged about updating).

10. The final step is to launch AirPort Utility and confirm that it works. You’ll probably want to go into preferences and turn off the option to check for updates. If all is good you can remove the temporary directory: cd .. ; rm -rf tmp (or drag it into the trash with Finder).

Password Protect Zip Files in Mac OS X

Creating a password protected zip file is easy in Mac OS X and does not require any add-ons or downloads. Instead, use the zip utility that is bundled with all Macs.

If you’re familiar with the command line, the syntax of the encrypted zip command is as follows:
zip -e [archive] [file]

If you’re not sure how to use that, read on to learn how to create zip archives encrypted with passwords. These encrypted zip files will maintain password protection across platforms, meaning you can send a protected zip file to a Windows user and they will still need to enter the password in order to view the contents.

Set a Zip Password in Mac OS X

You can create password protected archives of files and folders:

    1. Launch the Terminal from the Applications > Utilities folder
    2. Type the following command:

zip -e archivename.zip filetoprotect.txt

  1. Enter and verify the password – don’t forget this

The resulting archive, in this case named “archivename.zip”, is now encrypted with the password provided. The file that was encrypted, “filetoprotect.txt”, is now inaccessible without entering that password.

Example: Zipping a Folder and Setting a Password
Here is an example of what this will look like from the command line, in this case we are compressing and password protecting the entire ‘Confidential’ folder located within the users /Documents directory, and the password protected zip is being placed on the users desktop for easy access:
$ zip -e ~/Desktop/encrypted.zip ~/Documents/Confidential/
Enter password:
Verify password:
adding: ~/Documents/Confidential/ (deflated 13%)

Notice the password will not display, this is normal behavior for the Terminal.

Opening the Password Protected Zip

Despite being created at the command line, you do not need to unzip the file from the terminal, it can be expanded from the Mac OS X Finder or within Windows using standard unzipping apps. Just double click on the file, enter the password, and it will decompress. You can also decompress the zip archive from the command line with:
unzip filename.zip

Here are some use cases for password protected zip archives:

  • Password protecting an individual file or directory
  • Sending a sensitive and encrypted file over an unencrypted network
  • Emailing confidential data to a Windows user
  • Adding an additional layer of security to a hidden folder
  • Password protecting your own backups, outside of Time Machine

Create a password protected zip file in Mac

To create password protected zip file in Mac, follow the steps below:-

  • Go to Finder -> Application -> Terminal
  • now change directory to the plance you wan to zip and enter the command below:-
    $ zip -e myzipfile.zip file1.txt file2.txt
  • Once you enter the command, system will prompt you for password twice. Just enter the password you wish to set, and it’s done!
  • You should see myzipfile.zip appear in the directory.


DMG to ISO

This tip creates ISO images from DMG images, so they can be burned elsewhere. To convert the file to an ISO image, type the following command at your terminal window:


 hdiutil convert /path/to/filename.dmg -format UDTO -o /path/to/savefile.iso

Replace /path/to/filename.dmg with the path and name of the existing .DMG file, and replace /path/to/savefile.iso with the desired path and name for the converted image.

How to Copy a CD or DVD Using Disk Utility

These are instructions on how to make a duplicate copy of CD or DVD using Mac OS X Leopard Disk Utility.

Step One
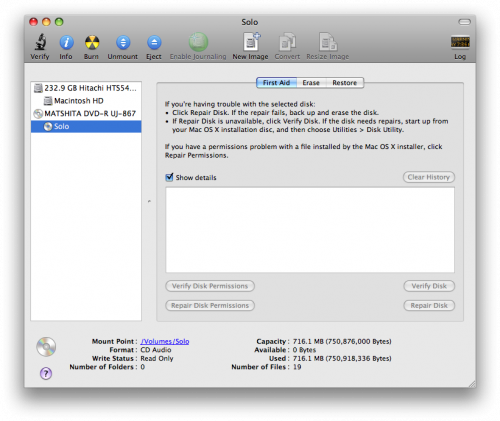
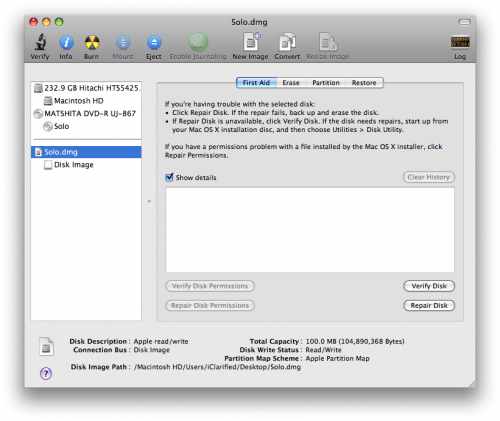
Launch Disk Utility from Applications:Utilities and select your CD from the list on the left.

Step Two
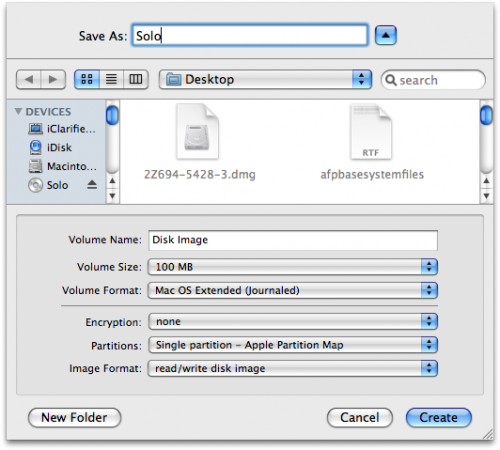
Click the New Image button to create a dmg of your CD or DVD.

Step Three
Enter a name and location to save your image as then click the Create button.

Step Four
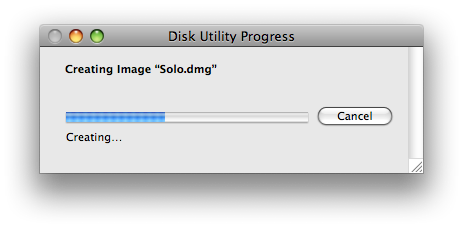
Disk Utility will now create your new disk image.

Step Five
Once done you will notice that your disk image will appear on the left hand side of the Disk Utility window. (ie Solo.dmg).

Step Six
Select the dmg from the left side of the Disk Utility menu then click the Burn button.

Step Seven
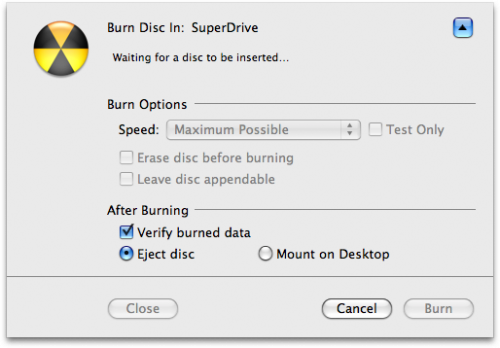
Your original CD or DVD will then be ejected and Disk Utility will indicate that it is waiting for a blank CD or DVD.

Step Eight
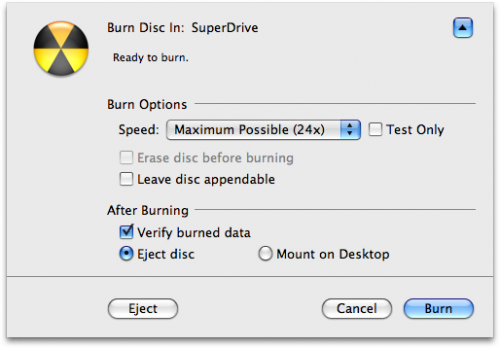
Insert a blank CD or DVD then click the Burn button.

Step Nine
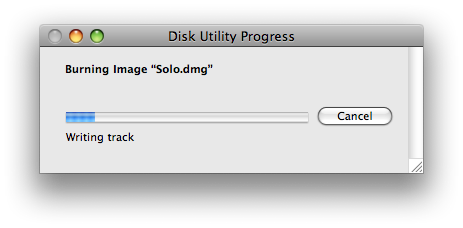
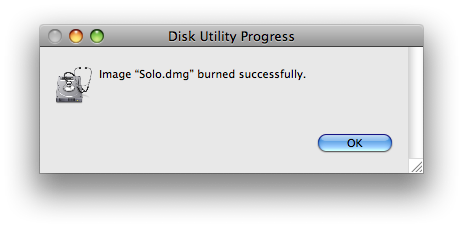
Once the burning has completed you will notified that it was successful. Click the OK button to finish the process.

OS X Tricks & Tips

1. Hold the Command key down to MOVE a file/folder to another disk (equals cut + paste)

2. Hold the Alt key down to move a COPY to another folder

3. Hold the Command and Alt keys down to draw an ALIAS (shortcut in windows)

4. Dragging with no extra keys activated will move the file if it’s within the same harddrive but make a copy if it’s dropped on another harddrive.

Mac OS X voices for using with the ‘say’ command

A neat trick if you have a Mac OS X machine is to do this (make sure your speakers are turned on):

  1. Open Terminal.app
  2. Type in at the command line: say hello world

This will make your computer say “hello world” in the default voice (Victoria).

Here is a list of the other voices you can also use:

Female Voices

  • $ say -v Agnes "hello world"
  • $ say -v Kathy "hello world"
  • $ say -v Princess "hello world"
  • $ say -v Vicki "hello world"
  • $ say -v Victoria "hello world"

Male Voices

  • $ say -v Bruce "hello world"
  • $ say -v Fred "hello world"
  • $ say -v Junior "hello world"
  • $ say -v Ralph "hello world"

Novelty Voices

  • $ say -v Albert "hello world"
  • $ say -v "Bad News" "hello world"
  • $ say -v Bahh "hello world"
  • $ say -v Bells "hello world"
  • $ say -v Boing "hello world"
  • $ say -v Bubbles "hello world"
  • $ say -v Cellos "hello world"
  • $ say -v Deranged "hello world"
  • $ say -v "Good News" "hello world"
  • $ say -v Hysterical "hello world"
  • $ say -v "Pipe Organ" "hello world"
  • $ say -v Trinoids "hello world"
  • $ say -v Whisper "hello world"
  • $ say -v Zarvox "hello world"