This error occurs when either of the following conditions is true:
- The Windows Boot Manager (Bootmgr) entry is not present in the Boot Configuration Data (BCD) store.
- The Boot\BCD file on the active partition is damaged or missing.
Resolution:
Method 1: Repair the BCD store by using the Startup Repair option
You can use the Startup Repair option in the Windows Recovery Environment to repair the BCD store. To do this, follow these steps:
- Put the Windows Vista installation disc in the disc drive, and then start the computer.
- Press a key when you are prompted.
- Select a language, a time, a currency, and a keyboard or another input method, and then click Next.
- Click Repair your computer.
- Click the operating system that you want to repair, and then click Next.
- In the System Recovery Options dialog box, click Startup Repair.
- Restart the computer.
Method 2: Rebuild the BCD store by using the Bootrec.exe tool
If the previous method does not resolve the problem, you can rebuild the BCD store by using the Bootrec.exe tool in the Windows Recovery Environment. To do this, follow these steps:
- Put the Windows Vista installation disc in the disc drive, and then start the computer.
- Press a key when you are prompted.
- Select a language, a time, a currency, and a keyboard or another input method, and then click Next.
- Click Repair your computer.
- Click the operating system that you want to repair, and then click Next.
- In the System Recovery Options dialog box, click Command Prompt.
- Type Bootrec /RebuildBcd, and then press ENTER.
- If the Bootrec.exe tool runs successfully, it presents you with an installation path of a Windows directory. To add the entry to the BCD store, type Yes. A confirmation message appears that indicates the entry was added successfully.
- If the Bootrec.exe tool cannot locate any missing Windows installations, you must remove the BCD store, and then you must re-create it. To do this, type the following commands in the order in which they are presented. Press ENTER after each command.
Bcdedit /export C:\BCD_Backupren c:\boot\bcd bcd.oldBootrec /rebuildbcd- Restart the computer.
Method 3: Rebuild the BCD store manually by using the Bcdedit.exe tool
If the previous method does not resolve the problem, you can rebuild the BCD store manually by using the Bcdedit.exe tool in the Windows Recovery Environment. To do this, follow these steps:
- Put the Windows Vista installation disc in the disc drive, and then start the computer.
- Press a key when you are prompted.
- Select a language, a time, a currency, and a keyboard or another input method, and then click Next.
- Click Repair your computer.
- Click the operating system that you want to repair, and then click Next.
- In the System Recovery Options dialog box, click Command Prompt.
- Type the following command, and then press ENTER:
cd /d Partition:\Windows\System32Note Partition represents the letter of the partition on which Windows Vista is installed. Typically, this is partition C.
- Type the following command, and then press ENTER:
bcdedit /enum allIn the Windows Boot Loader section of the output from this command, note the GUID that is listed for resumeobject. You will use this GUID later.
- Type the following command, and then press ENTER:
bcdedit -create {bootmgr} -d “Description“Note Description represents the description for the new entry.
- Type the following command, and then press ENTER:
bcdedit -set {bootmgr} device partition=Partition:Note Partition represents the letter of the partition. Typically, the letter is C.
- Type the following command, and then press ENTER:
bcdedit /displayorder {GUID}Note GUID represents the GUID that you obtained in step 8.
- Type the following command, and then press ENTER:
bcdedit /default {GUID}Note GUID represents the GUID that you obtained in step 8.
- Type the following command, and then press ENTER:
bcdedit /timeout ValueNote Value represents the time in seconds before the Windows Boot Manager selects the default entry that you created in step 12.
- Restart the computer.
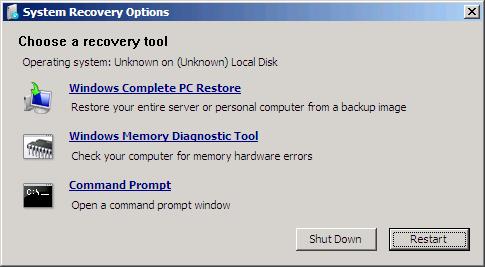
If you are booting from a Server 2008 install disk, when you use the “Repair your computer” option, the available options look like this:
You can access the repair option on a Server 2008 disk by choosing “command prompt”, then running “x:\sources\recovery\StartRep.exe”.


