Microsoft

Windows 10 VPN Flyout – no connect button

Windows 10 VPN has gone back in time, when you click your network icon in the system tray, and click one of your VPN connections, it opens a window with all the VPN connections.

Want it back like it was in Windows 8


  1. Open regedit (WIN+R and type regedit.exe)
  2. Navigate to HKEY_LOCAL_MACHINE\Software\Microsoft\Windows\CurrentVersion\Control Panel\Settings\Network
  3. Take ownership of the “Network” key/folder (right click, Permissions)
  4. Select “Advanced” in the Permissions window
  5. In the Advanced window, select “Change” where the owner field is (at the top of the window)
  6. Type in your username and save your changes.
  7. Close the advanced window
  8. Now select “Administrators” in the security tab
  9. Make sure “Full control” is selected, then apply changes
  10. Now that’s done, double click “ReplaceVan”
  11. Change it’s value to 2

Now try your network Icon in system Tray, a lost feature has now returned


Fix Double click IE desktop icon creates shortcut

Remove the bad IE icon from desktop, either delete or right click desktop -> Properties->Desktop->customize desktop-> uncheck Internet Explorer

Go to http://www.kellys-korner-xp.com/regs_edits/ie_fix.reg – Restore IE Desktop Shortcut Icon Functions

Download that.

Open registry, go to HKEY_CLASSES_ROOT\CLSID\{871C5380-42A0-1069-A2EA-08002B30309D}

Delete that key {871C5380-42A0-1069-A2EA-08002B30309D} + all sub keys

Go to HKEY_CURRENT_USER\Software\Microsoft\Windows\CurrentVersion\Explorer\CLSID\{871C5380-42A0-1069-A2EA-08002B30309D}

Delete that key {871C5380-42A0-1069-A2EA-08002B30309D} + all sub keys

Merge that registry script into registry.

Last, right click desktop -> Properties->Desktop->customize desktop-> check Internet Explorer hit ok, and ok

Should be all set

SBS 2003 has lost its CAL’s (Client Access Licenses reset to 5)

Problem

Been a while since I’ve seen this one, and strangely I didn’t document it. so when I was asked this morning I searched here on PeteNetLive, and In my personal database of solutions but the cupboard was bare.

Solution

1. Before you do anything make sure your SBS has plenty of space on the hard drive, simply running out of room on the system drive can cause SBS to lose its licences, make sure this is not your problem.

2. If you have plenty of room, then click Start > Run > services.msc {enter}. Locate the Licence Logging service > Right Click > Stop.

3. Locate the licstr.cpa file (it’s in C:\windows\system32 by default) > Rename it to licstr.OLD.

4. Locate the autolicstr.cpa (Should be in the same folder) and COPY it to your desktop to create a backup, Then rename the original to licstr.cpa

5. Back in the services console restart the “Licence Logging Service”.

6. Your licences should now be back in place.

7. Finally, you will notice there’s an option in the Licensing console to back up your licences,now would be a good time, to avoid having to do this again.

Start the Network and Internet Troubleshooting Wizards from the Command-Prompt

The network and Internet troubleshooting wizards can also be started from the command line, using the parameters below. All you need is to copy and paste these commands in the Run window (press the Windows key + R) or in the Command Prompt:

  • To open the Internet Connections troubleshooter:msdt.exe -id NetworkDiagnosticsWeb
  • To open the Shared Folders troubleshooter:msdt.exe -id NetworkDiagnosticsFileShare
  • To open the HomeGroup troubleshooter:msdt.exe -id HomeGroupDiagnostic
  • To open the Network Adapter troubleshooter:msdt.exe -id NetworkDiagnosticsNetworkAdapter
  • To open the Incoming Connections troubleshooter:msdt.exe -id NetworkDiagnosticsInbound

BOOTMGR is missing


Cause:

This error occurs when either of the following conditions is true:

  • The Windows Boot Manager (Bootmgr) entry is not present in the Boot Configuration Data (BCD) store.
  • The Boot\BCD file on the active partition is damaged or missing.

Resolution:

Method 1: Repair the BCD store by using the Startup Repair option

You can use the Startup Repair option in the Windows Recovery Environment to repair the BCD store. To do this, follow these steps:

  1. Put the Windows Vista installation disc in the disc drive, and then start the computer.
  2. Press a key when you are prompted.
  3. Select a language, a time, a currency, and a keyboard or another input method, and then click Next.
  4. Click Repair your computer.
  5. Click the operating system that you want to repair, and then click Next.
  6. In the System Recovery Options dialog box, click Startup Repair.
  7. Restart the computer.

Method 2: Rebuild the BCD store by using the Bootrec.exe tool

If the previous method does not resolve the problem, you can rebuild the BCD store by using the Bootrec.exe tool in the Windows Recovery Environment. To do this, follow these steps:

  1. Put the Windows Vista installation disc in the disc drive, and then start the computer.
  2. Press a key when you are prompted.
  3. Select a language, a time, a currency, and a keyboard or another input method, and then click Next.
  4. Click Repair your computer.
  5. Click the operating system that you want to repair, and then click Next.
  6. In the System Recovery Options dialog box, click Command Prompt.
  7. Type Bootrec /RebuildBcd, and then press ENTER.
    • If the Bootrec.exe tool runs successfully, it presents you with an installation path of a Windows directory. To add the entry to the BCD store, type Yes. A confirmation message appears that indicates the entry was added successfully.
    • If the Bootrec.exe tool cannot locate any missing Windows installations, you must remove the BCD store, and then you must re-create it. To do this, type the following commands in the order in which they are presented. Press ENTER after each command.
      Bcdedit /export C:\BCD_Backup
      ren c:\boot\bcd bcd.old
      Bootrec /rebuildbcd
  8. Restart the computer.

Method 3: Rebuild the BCD store manually by using the Bcdedit.exe tool

If the previous method does not resolve the problem, you can rebuild the BCD store manually by using the Bcdedit.exe tool in the Windows Recovery Environment. To do this, follow these steps:

  1. Put the Windows Vista installation disc in the disc drive, and then start the computer.
  2. Press a key when you are prompted.
  3. Select a language, a time, a currency, and a keyboard or another input method, and then click Next.
  4. Click Repair your computer.
  5. Click the operating system that you want to repair, and then click Next.
  6. In the System Recovery Options dialog box, click Command Prompt.
  7. Type the following command, and then press ENTER:
    cd /d Partition:\Windows\System32

    Note Partition represents the letter of the partition on which Windows Vista is installed. Typically, this is partition C.

  8. Type the following command, and then press ENTER:
    bcdedit /enum all

    In the Windows Boot Loader section of the output from this command, note the GUID that is listed for resumeobject. You will use this GUID later.

  9. Type the following command, and then press ENTER:
    bcdedit -create {bootmgr} -d “Description

    Note Description represents the description for the new entry.

  10. Type the following command, and then press ENTER:
    bcdedit -set {bootmgr} device partition=Partition:

    Note Partition represents the letter of the partition. Typically, the letter is C.

  11. Type the following command, and then press ENTER:
    bcdedit /displayorder {GUID}

    Note GUID represents the GUID that you obtained in step 8.

  12. Type the following command, and then press ENTER:
    bcdedit /default {GUID}

    Note GUID represents the GUID that you obtained in step 8.

  13. Type the following command, and then press ENTER:
    bcdedit /timeout Value

    Note Value represents the time in seconds before the Windows Boot Manager selects the default entry that you created in step 12.

  14. Restart the computer.

If you are booting from a Server 2008 install disk, when you use the “Repair your computer” option, the available options look like this:

You can access the repair option on a Server 2008 disk by choosing “command prompt”, then running  “x:\sources\recovery\StartRep.exe”.


Recovering Disk Space on the C: Drive in Small Business Server 2008

SBS 2008 installs all of its features using a single volume (C:), there are tools available to move some of the data to other locations, but a number of folders that remain in the C: volume can continue to grow if left unchecked, this can potentially eat all the available disk space on the C: drive. Once the C: drive reaches certain low space thresholds, some services will stop functioning properly on the server, while others will change their behavior to prevent data loss. Usually, administrators realize they have a problem when e-mail flow is impacted, under low disk space conditions, due to the Exchange Back Pressure features, mail flow will stop. Users may experience some of the following errors or non-delivery-reports: Error 0x800CCC6C, SMTP_452_NO_SYSTEM_STORAGE, or 452 4.3.1 Insufficient system resources.

These are some of the steps that can be performed to help recover and prevent these issues.

IIS and SBS Logs

(This is expanding on the existing post “Reclaiming Disk Space Lost to IIS Logs on SBS 2003 and SBS 2008”)

By default, all IIS hosted web sites have logging enabled, this can lead to some large folders in C:inetpublogsLogFiles (Review this post in case you have moved your log files). You may also want to specifically stop logging all together for certain web sites, in particular, the “WSUS Administration” web site (Site Id 1372222313). For this, perform the following steps:

  1. Launch IIS Manager from Administrative Tools.
  2. Expand Server, Sites, and select the WSUS Administration web site.
  3. On the feature panel, click to open Logging.
  4. Click Disable in the Actions panel (rightmost panel)
  5. Repeat the steps for any other web site. Please note that logging may be needed for troubleshooting or auditing purposes on sites that are public facing, this is usually not the case on the WSUS Administration site.

Some of the SBS 2008 log files can grow to very large sizes, all SBS logs are stores in this folder (and subfolders): C:Program FilesWindows Small Business ServerLogs. Some of the logs that will grow the most and may need trimming are:

  • Console.log, this log will continue to grow while the SBS Console is running.
  • *.evtx files, these are the event logs before the setup of the server completed, they can be safely removed if the server has been in production and had no setup issues.
  • W3wp.log, in the C:Program FilesWindows Small Business ServerLogsWebWorkplace folder. This is the log for Remote Web Workplace.
  • The C:Program FilesWindows Small Business ServerLogsMonitoringServiceLogs folder. These are the logs for the Windows SBS Manager service.

POP3 Connector Badmail directory

If you are using the POP3 Connector, you may end up with emails that failed to be delivered (rejected by the local Exchange server) inC:Program FilesWindows Small Business ServerDatabadmail. This folder will be automatically trimmed to 400mb once it reaches 450mb once a week.

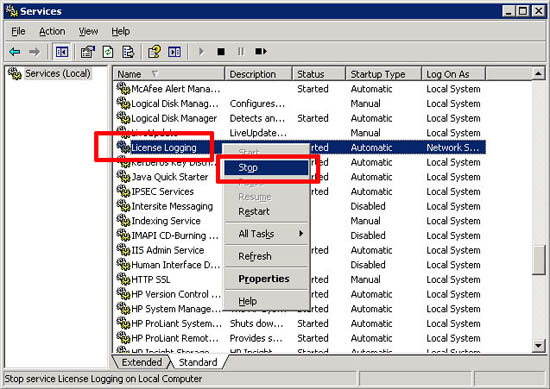
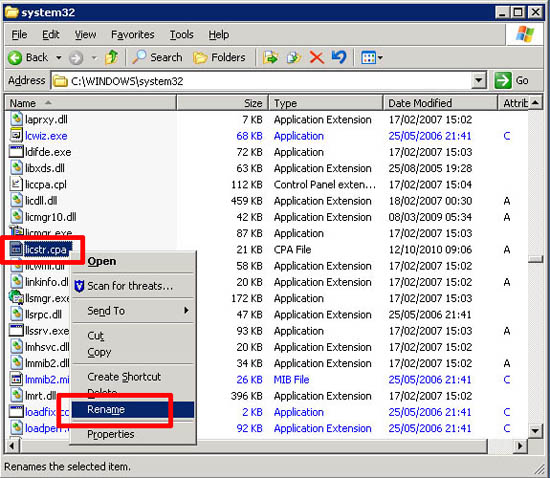
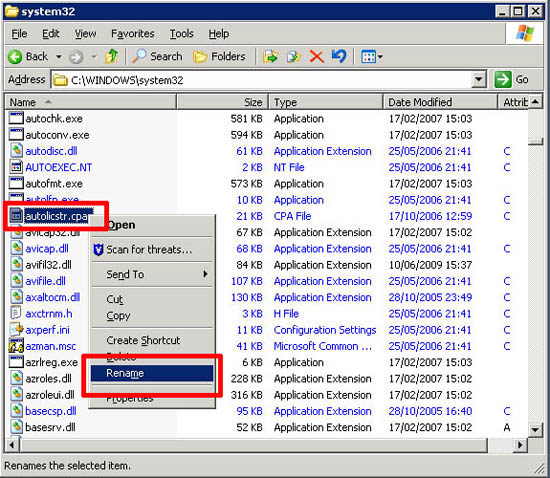
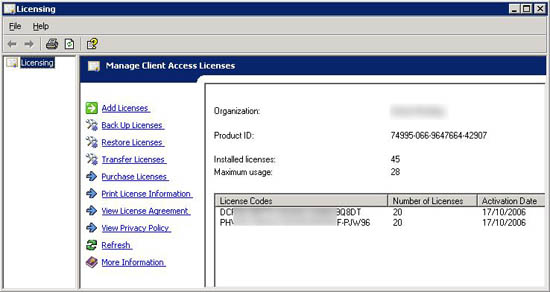
The licensing log can consume a significant amount of hard disk space

This is discussed on the Windows Small Business Server 2008 Release Documentation
You can delete the events in the Windows SBS 2008 licensing log to free up additional space on the hard disk drive.

To delete events in the Windows SBS 2008 licensing log

  1. From the server, open a Command Prompt window as an administrator. To do this, click Start, and then in the Search box, typecommand prompt.
  2. In the list of results, right-click Command Prompt, and then click Run as administrator.
  3. At the command prompt, type the following command: del “%systemroot%system32winevtlogsMicrosoft-Windows-Server Infrastructure Licensing*%4Debug.etl.*”

You can also use Registry Editor to disable the licensing log.

  1. Click Start, type regedit, and then press ENTER.
  2. In Registry Editor, locate and then click the following registry key:
    HKEY_LOCAL_MACHINESOFTWAREMicrosoftServerInfrastructureLicensing
  3. In the details pane, right-click TraceMask, and then click Modify.
  4. In the Edit DWORD dialog box, change the value for Value data to 0 (zero), and then click OK.
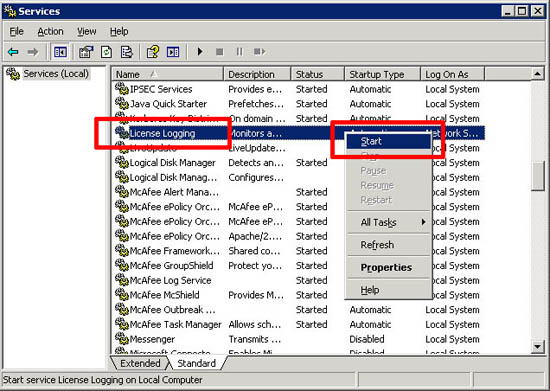
  5. Restart the server.

Windows Server Update Services (WSUS) Server Cleanup Wizard

In WSUS, you can delete unused updates and update revisions, computers not contacting the server, unneeded update files, expired updates and superseded updates. In order to accomplish this, you have to manually go through the WSUS Server Cleanup Wizard.
To run the Server Cleanup Wizard :

  1. In the WSUS administration console (launch it from the Administrative Tools), select Options, and then Server Cleanup Wizard.
  2. By default this wizard will remove unneeded content and computers that have not contacted the server for 30 days or more. Select all possible options, and then click Next.
  3. The wizard will begin the cleanup process, and will present a summary of its work when it is finished, depending on the server performance, this may take a very long time. Click Finish to complete the process.

Very large SharePoint SQL transaction log file

Please read the following KB article for an explanation and instructions on how to prevent this:
2000544 SBS 2008 BPA Reports that The Windows SharePoint Services configuration databases log file is getting large (currently over 1gb in size)

Active Directory Certificate Services transaction log files

When completing a critical or system state backup of the C: volume, a new transaction log will be generated under thec:windowssystem32certlog folder. Removing these logs is only safe as long as the CA database file is consistent. In order to remove these logs and reclaim disk space, follow these steps:

  1. Open the Services MMC and stop the Active Directory Certificate Services service.
  2. Make a backup copy of ALL the file contents present in the c:windowssystem32certlog folder.
  3. Delete EDB.CHK and all the files that have an extension of .LOG (*.LOG)
  4. Restart the Active Directory Certificate Services service.

Windows Component Clean Tool

The Windows Component Clean Tool (COMPCLN.exe) can be used to remove the files that are archived after Windows Vista SP2 or Windows Server 2008 SP2 is applied. It also removes the files that were archived after Windows Vista SP1 was applied, if they are found on the system. Running this tool is optional.

Installing Windows Server 2008 service packs increases the amount of disk space that is used by the operating system. This space is used to archive files so that the service pack can be uninstalled. Typically, you should run COMPCLN.exe if you want to reclaim this disk space after applying SP2 and if you will not need to uninstall SP2.

NOTE: You cannot uninstall Windows Vista SP2 or Windows Server 2008 SP2 after you run this tool on an image.

Move Data Wizards

We are not going to focus on these wizards on this post, but as a reference, SBS 2008 provides an automated way of moving the following:

  • Move Exchange Server Data: which moves both the exchange database file as well as your exchange transaction logs for all storage groups.
  • Move Windows SharePoint Services Data: Moves the SharePoint Content and Configuration databases.
  • Move Users’ Shared Data: Moves C:UsersShares directory and all sub directories
  • Move Users’ Redirected Documents Data: Moves C:UsersFolderRedirections directory and all sub directories
  • Move Windows Update Repository Data: Moves the repository data from C:WSUSWSUSContent and C:WSUSUpdateServicePackages. Please note it does NOT move the SUSDB Folder and the WSUS database which contains the metadata.
  • More Resources:
    Manage Server Storage by using Windows SBS Console
    Moving Data on Windows Small Business Server 2008
    Introducing Server Storage Management in SBS 2008

Update #1 3/3:
Added reference to WSUS Administration web site ID (Site Id 1372222313)
Added reference to Exchange 2007 BackPressure NDRs and errors due to low disk space


From Microsoft Technet

[Post comes to us courtesy of Damian Leibaschoff and Wayne Gordon McIntyre from Commercial Technical Support and Chris Puckett from Product Quality]

Quickly Find Local Open Ports

Usually, if you want to see all the used and listening ports on your computer, you’d use the NETSTAT command.

Note: The NETSTAT command will show you whatever ports are open or in use, but it is NOT a port scanning tool! If you want to have your computer scanned for open ports see this page instead (link will follow shortly).

Open Command Prompt and type:

C:'WINDOWS>netstat -an |find /i "listening"
TCP   0.0.0.0:135   0.0.0.0:0   LISTENING
TCP   0.0.0.0:445   0.0.0.0:0   LISTENING
TCP   0.0.0.0:1025   0.0.0.0:0   LISTENING
TCP   0.0.0.0:1084   0.0.0.0:0   LISTENING
TCP   0.0.0.0:2094   0.0.0.0:0   LISTENING
TCP   0.0.0.0:3389   0.0.0.0:0   LISTENING
TCP   0.0.0.0:5000   0.0.0.0:0   LISTENING

You can redirect it to a text file by adding >c:’openports.txt to the command, if you want to:

    netstat -an |find /i "listening" > c:'openports.txt

netstat -an |find /i “listening” > c:’openports.txt

You can also change “listening” to “established” to see what ports your computer actually communicates with:

    C:'WINDOWS>netstat -an |find /i "established"
    TCP   192.168.0.100:1084   192.168.0.200:1026   ESTABLISHED
    TCP   192.168.0.100:2094   192.168.0.200:1166   ESTABLISHED
    TCP   192.168.0.100:2305   209.211.250.3:80   ESTABLISHED
    TCP   192.168.0.100:2316   212.179.112.230:80   ESTABLISHED
    TCP   192.168.0.100:2340   209.211.250.3:110   ESTABLISHED

Note: In Windows XP and Windows Server 2003, you can type NETSTAT -O to get a list of all the owning process ID associated with each connection:

C:'WINDOWS>netstat -ao |find /i "listening"
TCP   pro1:epmap   pro1.dpetri.net:0   LISTENING   860
TCP   pro1:microsoft-ds   pro1.dpetri.net:0   LISTENING   4
TCP   pro1:1025   pro1.dpetri.net:0   LISTENING   908
TCP   pro1:1084   pro1.dpetri.net:0   LISTENING   596
TCP   pro1:2094   pro1.dpetri.net:0   LISTENING   596
TCP   pro1:3389   pro1.dpetri.net:0   LISTENING   908
TCP   pro1:5000   pro1.dpetri.net:0   LISTENING   1068

You can use PULIST from the W2K Resource Kit (Download Free Windows 2000 Resource Kit Tools) to find the PID and see what process uses it and who started it. For example, you found out that your computer had an open connection to a remote IP address on TCP port 80, and you don’t have any Internet Explorer or other browser windows open. You want to find out what process is using that session.

C:'WINDOWS>netstat -no

Active Connections

Proto Local Address Foreign Address State PID
TCP   192.168.0.100:2496   212.179.4.7:80   ESTABLISHED   1536

You can then use PULIST with the FIND command:

C:'WINDOWS>pulist |find /i "1536"

Process   PID   User
LUCOMS~1.EXE   1536   DPETRI'danielp

In this case, LUCOMS~1.EXE is run by DANIELP (myself) and as it happens, it’s the Symantec Live Update process.

You can also look in Task Manager for the respective PID.

  1. To set up Task Manager to show the PID column open Task Manager by using CTRL+SHIFT+ESC.
  2. Go to the Processes tab, click View and then Select Columns.

  1. In the Select Columns windows click to select PID and then click Ok.

  1. You can sort the PID column to display the PIDs in descending or ascending order.


Remote Shutdown – XP, Server 2003

From the command line, you can shut down or reboot any Windows Server 2003 computer (or even Windows XP or Vista machines) with the Shutdown.exe command. (Note: The exe file extension is optional for the Shutdown command.) Shutdown.exe contains a number of switches that allow you to specify different actions for the server when the Shutdown command executes. The Shutdown.exe switches are as follows:

/? Displays the Help listing
/i Displays the graphical user interface (GUI); it must be the first option
/l Logs off the current user; it cannot be used with the /d or /m options
/s Shuts down the computer
/r Shuts down and restarts the computer
/g Shuts down and restarts the computer and then restarts any registered applications
/a Aborts system Shutdown
/p Turns off the local computer with no timeout or warning
/h Hibernates the local machine
/e Documents the reason for shutting down the computer
/m Specifies the target computer; it is used with \\computername
/t xxx Where xxx is the number of seconds before Shutdown
/c “comment” Where “comment” is the reason for the Shutdown or restart
/f Forces running applications to close without warning users
/d [p|u:]xx:yy Provides the reason for the Shutdown action: p = planned; u= unplanned; xx supplies the major reason code; yy = supplies the minor reason code

When you enter a Shutdown with no arguments, the Help listing will display. The Help listing also includes the reason codes available for use with the /d switch. The reason codes are shown below:

Reasons on this computer:
E=Expected U=Unexpected P=Planned c=Customer Defined
Type Major Minor Title
U

0

0

Other(Unplanned)
E

0

0

Other(Unplanned)
EP

0

0

Other(Planned)
U

0

5

Other Failure: System Unresponsive
E

1

1

Hardware: Maintenance(Unplanned)
EP

1

1

Hardware: Maintenance(Planned)
E

1

2

Hardware: Installation(Unplanned)
EP

1

2

Hardware: Installation(Planned)
P

2

3

Operating System: Upgrade (Planned)
E

2

4

Operating System:
Reconfiguration (Unplanned)
EP

2

4

Operating System:
Reconfiguration(Planned)
P

2

16

Operating System:
Service Pack (Planned)
U

2

17

Operating System:
Hotfix (Unplanned)
P

2

17

Operating System:
Hotfix(Planned)
U

2

18

Operating System:
Security Fix(Unplanned)
P

2

18

Operating System:
Security Fix(Planned)
E

4

1

Application: Maintenance(Unplanned)
EP

4

1

Application: Maintenance(Planned)
EP

4

2

Application: Installation(Planned)
E

4

5

Application: Unresponsive
E

4

6

Application: Unstable
U

5

15

System Failure: Stop Error
E

5

19

Security Issue
U

5

19

Security Issue
EP

5

19

Security Issue
E

5

20

Loss of Network Connectivity
(Unplanned)
U

6

11

Power Failure: Cord Unplugged
U

6

12

Power Failure: Environment
P

7

0

Legacy API Shutdown

You can use many of these switches in conjunction with one another when issuing the Shutdown command. A usage example for the Shutdown command follows:

Shutdown /r /c “Hanging Application or service” /t 30

This example would restart the local machine storing the comment provided with the /c switch. Windows would wait 30 seconds before initiating the restart. You might also create a batch file to use when it is necessary to restart a server in a remote location. The batch file might look like this:

Shutdown /m \\computername /r /c “Remote Restart” /t 45

By saving this command in a batch file, it can save you time if you routinely restart the same remote server.