Exchange Server

Item Recovery in Exchange 2010

Exchange 2010 includes the capability to ensure that deleted items are retained within the dumpster till the deleted item retention period. This prevents accidentally or maliciously deleted items from being deleted permanently, and allows an administrator to recover such items. This feature is known as Single Item Recovery and it enables organizations to change their backup paradigms (i.e., you no longer need to maintain backups for single item recovery), and to retain and allow discoverability of the data to meet compliance requirements.

Essentially there are two steps:

  1. Search – Determining the location of the missing items.
  2. Recovery – Retrieving the missing items.

Remember, in order to discover and recover the data, each mailbox needs to have Single Item Recovery enabled prior to the accidental purge event. Therefore, we recommend enabling Single Item Recovery for mailboxes as part of the Exchange 2010 upgrade process.

The Scenario

Ross sent his administrative assistant, Julie, a message regarding his upcoming trip to Seattle, specifically requesting Julie to book his itinerary. Unfortunately, before she could work on Ross’ request, Julie shift-deleted the message while cleaning out her mailbox. Like most users, Julie has done this before and is familiar with the Recover Deleted Items capability within Outlook. However, this time, Julie made the mistake of clicking the delete button for the message in question instead of clicking the recover button. Panicking, Julie calls Help Desk to request recovery of the item.

Step 1: Search

The help desk ticket results in a workflow process that is performed by an IT administrator who has necessary rights to perform searches (in this scenario, the Help Desk technician’s user account has been delegated the Discovery Management role).

Note: By default, no accounts have the ability to perform mailbox searches. You can either create a custom role group to allow an administrator to search only a subset of mailboxes, or add the administrator to the Discovery Management built-in role group (which allows them to search all mailboxes in the Exchange organization) by using the following command:
Add-RoleGroupMember “Discovery Management” -Member <user account>

The Help Desk technician has two choices for performing discovery, and the choice will depend on the target user’s client access license (CAL):

  1. If the users included in the search have Standard CALs, the Help Desk technician can only use the Search-Mailbox cmdlet.
  2. If the users included in the search have Enterprise CALs, the Help Desk technician can also use the New-MailboxSearch cmdlet, or the Multi-Mailbox Search feature in the Exchange Control Panel (ECP).

In Julie’s case, she provided the Help Desk technician with the following information:

  • The message was sent from her boss.
  • The message contains the word “Seattle”.

Searching messages by using Search-Mailbox

When a mailbox with a Standard CAL will be searched, the Search-Mailbox cmdlet will be used. The Search-Mailbox cmdlet requires the following information:

  • The mailbox to be searched
  • The search query criteria
  • The mailbox and folder where the results will be placed
  1. Knowing this information, the Help Desk technician executes the following command from the Shell:Search-Mailbox sec -SearchQuery “from:’boss’ AND seattle” -TargetMailbox “Discovery Search Mailbox” -TargetFolder “Secretary Recovery” -LogLevel FullNote: Search-Mailbox does not allow the target mailbox to be the same as the source mailbox. Search-Mailbox does allow you to be very specific in your search criteria. Besides scoping the search with the SearchQuery parameter using Advanced Query Syntax (AQS), in Exchange 2010 SP1 you can also use the SearchDumpsterOnly switch to search only items in the dumpster.The Help Desk technician receives the following output:RunspaceId : fb25cadf-a63f-4e88-8567-cb4ae1b30ade
    Identity : corp.contoso.com/Users/Secretary
    TargetMailbox : corp.contoso.com/Users/DiscoverySearchMailbox {D919BA05-46A6-415f-80AD-7E09334BB852}
    TargetPSTFile :
    Success : True
    TargetFolder : \Secretary Recovery\Secretary-4/14/2010 6:28:33 AM
    ResultItemsCount : 1
    ResultItemsSize : 1.577 KB (1,615 bytes)
  2. The Help Desk technician then logs into OWA and opens the Discovery Search Mailbox via the Open Other Mailbox option:Note: The OWA and ECP screenshots are from Exchange 2010 SP1. These are preliminary screen shots from pre-Beta software that are subject to change before the final release of SP1.
  3. The Help Desk technician navigates the folder structure within the Discovery Search Mailbox and verifies that he has recovered the item in question:

Searching messages by using Multi-Mailbox Search

When a mailbox with an Enterprise CAL will be searched, the administrator can use the Multi-Mailbox Search feature in the Exchange Control Panel. The Help Desk technician takes the following steps:

  1. He launches the Exchange Control Panel via https://mail.contoso.com/ecp and logs on using his credentials.
  2. From the Options drop-down, he selects Manage My Organization.
  3. He clicks on Service Level and selects the Mailbox Searches applet.
  4. He clicks New to create a new search request which requires at least the following information:
    1. The search query criteria
    2. The mailbox to be searched
    3. The mailbox and folder where the results will be placed
  5. When the results are obtained, he can either click on the [Open] link in the Mailbox Searches Results pane, or open the Discovery Search Mailbox via the Open Other Mailbox option from within OWA.
  6. He navigates the folder structure within the Discovery Search Mailbox and verifies that he has recovered the item in question:

Step 2: Recovery

At this point the Search phase is complete and the Recovery phase begins. There are two options for how to recover and return the item back to the user and it depends on the version of Exchange 2010 you have deployed:

  1. If you are running Exchange 2010 RTM or later, you can utilize the Search-Mailbox cmdlet to restore the item back to the user.
  2. If you are running Exchange 2010 SP1, you can utilize the PST import and export cmdlets to restore the item back to the user.

Search-Mailbox Recovery Process

  1. The Help Desk technician executes the following command from the Shell:Search-Mailbox “Discovery Search Mailbox” -SearchQuery “from:’boss’ AND seattle” -TargetMailbox sec -TargetFolder “Recovered by HelpDesk” -LogLevel Full -DeleteContentHe receives the following output:RunspaceId : fb25cadf-a63f-4e88-8567-cb4ae1b30ade
    Identity : corp.contoso.com/Users/DiscoverySearchMailbox {D919BA05-46A6-415f-80AD-7E09334BB852}
    TargetMailbox : corp.contoso.com/Users/Secretary
    TargetPSTFile :
    Success : True
    TargetFolder : \Recovered by HelpDesk\Discovery Search Mailbox-4/14/2010 6:32:49 AM
    ResultItemsCount : 1
    ResultItemsSize : 1.577 KB (1,615 bytes)
  2. He notifies Julie that the item is recovered. Julie logs into her mailbox and verifies she has the correct item:

It’s important to note that due to the two-step process involved with Search-Mailbox (copying the results to the Discovery Mailbox and then copying the results back to the user’s mailbox) the hierarchy is same for the end user – the root of the Discovery Search Mailbox, as well as the folder target that was used to place the item in the Discovery Search Mailbox, are both visible.

PST Export/Import Recovery Process

Exchange 2010 SP1 includes infrastructure that allows administrators to perform bulk import and export of PST files without requiring the installation of the Outlook client. This infrastructure, supported by the cmdlets *-MailboxImportRequest and *-MailboxExportRequest, leverages the Mailbox Replication Service and the framework that exists for moving mailboxes between databases (see Understanding Move Requests for more information).

To use this functionality, two prerequisites must be met:

  1. The person performing the import or export must have the appropriate permissions within Exchange. By default, no RBAC role group provides this functionality. To grant the ability for a help desk administrator, compliance officer, or Exchange administrator to perform bulk import/export capabilities against all mailboxes, the following commands must be executed:New-RoleGroup “Mailbox Import-Export Management” -Roles “Mailbox Import Export”
    Add-RoleGroupMember “Mailbox Import-Export Management” -Member <user account>The first command creates a new role group that grants access to the *-MailboxImportRequest and *-MailboxExportRequest cmdlets. The second command adds a user to the role group.
  2. The Exchange Trusted Subsystem security group must have Full Control/Owner permissions on the file share that will be used to temporarily store the PST files.

In this scenario, the Help Desk technician is a member of the Mailbox Import-Export Management role group and thus can utilize the Import and Export cmdlets. The Help Desk technician:

  1. Runs the following command from the Shell to export the recovered data from the Discovery Search Mailbox to a PST file:New-MailboxExportRequest -Mailbox “Discovery Search Mailbox” -FilePath “\\exchsvr\HelpDeskPst\SecretaryRecovery.pst” -ContentFilter {Subject -eq “april travel plans”} -SourceRootFolder “Secretary Recovery”
  2. Runs the following command from the Shell to import the recovered data into Julie’s mailbox:New-MailboxImportRequest -Mailbox sec -FilePath “\\exchsvr\HelpDeskPst\SecretaryRecovery.pst” -TargetRootFolder “Recovered By HelpDesk”
  3. Notifies Julie that the item is recovered.

At this point, Julie logs into her mailbox and verifies she has the correct item:

Conclusion

Exchange 2010 provides you the means to ensure data is not deleted from the system prior to the expiration of its deleted item retention. In the event that a message is accidentally or maliciously purged from the user’s dumpster, it can be easily recovered and restored using built-in tools.

Exchange Database Maintenance

Perform Integrity Checks
Exchange performs the automated maintenance tasks on its databases every night. You should still perform a manual integrity check on a quarterly basis. Manual checks let you see if there are any problems with the databases and take corrective action if necessary.

Before performing an integrity check, make sure you have a full backup of the database. In rare situations, performing manual database maintenance can cause database corruption. You also need to make sure you have adequate disk space. If you have to perform any type of repair on the database, you’ll need enough free space on the volume for a full copy of the database, plus another 10 to 20 percent for overhead.

To perform a server-level integrity check, you first need to dismount the Store. In Exchange 2007, open Exchange Management Console and navigate through the console tree to Server Configuration\Mailbox. Next, right-click the database you want to check and select Dismount Database from the shortcut menu. To dismount a database in Exchange 2003, open Exchange System Manager, navigate through the console tree to your store, right-click it, and choose Dismount Store from the shortcut menu.

After the database is dismounted, you can use Isinteg to check for errors in the database. Open a command prompt window, navigate to the \Program Files\Microsoft\Exchange Server\Bin folder, and enter the following command:

isinteg -s <servername> -test allfoldertests

When you run this command, you’ll receive a list of the databases on the server, as Figure 2 shows. Next, enter the number from the list for the database you want to test. Isinteg prompts you for confirmation; press Y to start the tests. If any errors are reported, Isinteg tells you what corrective action to take, and you should perform such actions right away.

If the server-level integrity check with Isinteg doesn’t return any errors, you should perform a database-level integrity check by using Eseutil. To do so, enter the following command:

eseutil /G "<database file path>"

In the above command, you would replace <database file path> with the actual database path (in quotes). For example, the command might be

eseutil /G "Q:\program Files\<br>     MicrosoftExchange Server\<br>     Mailbox First Storage Group\Database.edb"

Isinteg and Eseutil work the same in Exchange 2007 and Exchange 2003.

Check Your Database for Free Space
As already mentioned, Exchange defragments its databases as a part of the nightly maintenance cycle. However, an online defragmentation doesn’t actually shrink the size of the database. Instead, empty database pages, known as free space, are simply grouped together so they can be efficiently reused.

Usually this technique doesn’t present much of a problem, but there are circumstances when you might need to shrink a database. For example, if you moved some mailboxes to a different store as a way of freeing up disk space, you wouldn’t accomplish your goal unless you ran an offline defragmentation afterward.

Even if you aren’t trying to reduce the amount of space consumed by your databases, it’s a good idea to perform a quarterly check to make sure that the databases don’t contain excessive amounts of free space. Generally, free space is considered to be excessive if it occupies more than 15 percent of the total database. The easiest way to find out how much free space is in a database is to search your server’s application log for event ID 1221. As you can see in Figure 3, the Event Properties dialog box tells you how many megabytes of free space are in the database. Use this number along with the database’s total size to figure out the percentage of free space.

If you need to remove free space from a database, you can do so with the Eseutil command. You’ll have to dismount the database first, and be sure to follow the earlier words of caution about having a full backup and enough disk space for a backup copy. You would enter the command

eseutil /D "<database file path>"

where <database file path> is the actual database path.

Exchange Management Console pointing to wrong server “The attempt to connect to http://server.domain.com/PowerShell using “Kerberos” authentication failed

I came across this error during an Exchange 2010 Unified Messaging deployment. The EMC would not connect:

“The attempt to connect to http://server.domain.com/PowerShell using “Kerberos” authentication failed: connecting to remote server failed with the following error message : The WinRM client cannot complete the operation within the time specified.  Check if the machine name is valid and is reachable over the network and firewall exception for Windows Remote Management service is enabled.  For more information, see the about_Remote_Troubleshooting Help topic.”

There are various blog posts on the internet around how to fix the connectivity problem to the server, but in this case the server EMC was pointing to had been decommissioned properly and was no longer listed in AD. EMS would connect fine to a different working server.

In my case I had to take two actions to fixed it.

Close EMC

Under C:\users\<specific user>\AppData\Roaming\Microsoft\MMC\Exchange Management Console\ there is a config file. Delete it

In the registry under HKCU\Software\Microsoft\Exchangeserver\v14\AdminTools\NodeStructureSettings delete the value NodeStructureSettings

Only after both of these are done, did the EMC correctly rediscover an active Exchange 2010 server. If one or there other is done, the incorrect server information is retained.

Restoring Mailbox Data from a Recovery Database in Exchange 2010

Getting the Database into a Clean Shutdown State

In order for Exchange to mount a database, it needs to be in a clean shutdown state. I’ll use the eseutil tool to play any outstanding transactions into the database to get it clean. Before I begin, I’ll open a command prompt, switch to the directory that contains the database and logs, and use the following command to view the status:

eseutil /mh DB01.edb

When reviewing the output, the database state will be reported as Dirty Shutdown:

What I will do next is perform a soft recovery to get the database consistent. I’ll run the following command to do this:

eseutil /r e01 /d

The /r specifies that I’m doing a soft recovery. The e01 is the log generation prefix for the database. I’m using the /d switch without any arguments to specify the database path, which is in the current directory. Since the logs are also located here, I don’t need to use the /l switch, as it defaults to the current path. Once the operation has completed successfully, I can runeseutil again with the /mh switch to verify the database is clean shutdown:

Now that my database has been restored and brought to a clean shutdown state I can create the Recovery Database.

Creating the Recovery Database

The next step in the process is to create the Recovery database using the database files restored from the backup. To do this, I’ll use the New-MailboxDatabase cmdlet with the following syntax:

New-MailboxDatabase -Name RecoveryDB -EdbFilePath E:\RecoveryDB\E_\DB01\DB01.edb -LogFolderPath E:\RecoveryDB\E_\DB01 -Recovery -Server mbx1

Notice that I’ve specified the path to the database and log files using the location where the database was restored. Also, the key to creating the Recovery database is to make sure you use the -Recovery switch parameter, as shown above. You can see I got a warning message after running the command stating the Recovery database was created using an existing file, and that I need to ensure that the database is in a clean shut down state before I try to mount it. I already did this in the previous step, so I can safely ignore this message and mount the database using the following command:

Mount-Database RecoveryDB

The Recovery database is now mounted, and I’m ready to restore mailbox data.

Finding Mailboxes and Performing a Simple Mailbox Restore

Now that my Recovery database is online, I need to be able to see what mailboxes are available for restores. I can use the Get-MailboxStatistics cmdlet to do this:

Get-MailboxStatistics -Database RecoveryDB

If you’re looking for a specific mailbox, you can filter the results using the following syntax:

Get-MailboxStatistics -Database RecoveryDB | ?{$_.DisplayName -like 'Mike*'}

You can see in this command I’ve used the ? alias for the Where-Object cmdlet. I’m using the -like operator to filter the results and only show me the mailboxes that start with Mike.

When restoring mailbox data from a Recovery database in Exchange 2010 SP1, we use the New-MailboxRestoreRequestcmdlet. When running this cmdlet, the source mailbox in the recovery database needs to be identified using one of three possible values; the DisplayNameMailboxGUID, or LegacyExchangeDN values. Keep in mind that you cannot reference the source mailbox using the Exchange Alias when performing a restore.

So, let’s take a look at the restore process. Based on the previous commands I can see that there is a copy of my mailbox in the Recovery database. To do a complete restore of the mailbox data to the original mailbox that is currently active in the production database I’ll use the following command:

New-MailboxRestoreRequest -SourceDatabase RecoveryDB -SourceStoreMailbox 'Mike Pfeiffer' -TargetMailbox mpfeiffer

Depending on the size of the mailbox, it may take quite some time to perform the restore. I can keep tabs on the progress using the following one-liner:

Get-MailboxRestoreRequest | Get-MailboxRestoreRequestStatistics

Dealing with Multiple Mailboxes with the same DisplayName

It’s possible that a Recovery database will have multiple mailboxes with the same display name. This can happen if there were one or more disconnected versions of a mailbox, in addition to an active mailbox, in the same database during the time of the back up. In this case, you can use the MailboxGuid value to identify the source mailbox when doing a restore. Consider the following:

Get-MailboxStatistics -Database RecoveryDB | ?{$_.DisplayName -like 'Isabel*'} | fl DisplayName,MailboxGuid,DisconnectDate

Here you can see that there are two mailboxes with the same display name in the Recovery database. One has aDisconnectDate defined, meaning it is a disconnected mailbox, and the other one does not which means it was the active mailbox in the database at the time of the backup. If you run into a scenario where there are multiple mailboxes in a database with the same display name, use the above command to determine the MailboxGuid of each mailbox. You can then use this value to identify the correct mailbox when performing a restore.

New-MailboxRestoreRequest -SourceDatabase RecoveryDB -SourceStoreMailbox 4a1d2118-b8cc-456c-9fd9-cd9af1f549d0 -TargetMailbox ihill

Restoring Individual Mailbox Folders

Here you can see that I am using the -IncludeFolders parameter to specify that only data from the Inbox should be restored from the mailbox in the recovery database:

New-MailboxRestoreRequest -SourceDatabase RecoveryDB -SourceStoreMailbox administrator -TargetMailbox administrator -IncludeFolders '#Inbox#'

The -IncludeFolders will accept a list of one or more mailbox folders. You can specify well-known folder names as well as personal folders using this parameter. Notice that the value needs to be enclosed in hash marks (#). For example, if you wanted to restore only the contacts folder, use #Contacts#, or #Tasks# for the Tasks folder, and so on. For more details, check out the help for this parameter in the TechNet documentation for the New-MailboxRestoreRequest cmdlet. If you simply want to restore a single root folder, check out the -SourceRootFolder parameter.

Restoring to an Archive Mailbox

Restoring a mailbox to a users archive is as simple as tacking on the -TargetIsArchive switch parameter to our original restore command. Here’s the command and output:

New-MailboxRestoreRequest -SourceDatabase RecoveryDB -SourceStoreMailbox 'Mike Pfeiffer' -TargetMailbox mpfeiffer -TargetIsArchive

Obviously, you’ll need to ensure that the target mailbox has been archive enabled for this to work.

Restoring to an Alternate Mailbox

By default, the New-MailboxRestoreRequest cmdlet looks for a matching LegacyExchangeDN on the source and destination mailbox, or checks to see that an X500 proxy address on the target mailbox corresponds to the LegacyExchangeDN on the source mailbox. This ensures that you do not accidentially restore mailbox data to the wrong location. If you need to restore data to an alternate mailbox, you can use the -AllowLegacyDNMismatch switch parameter:

New-MailboxRestoreRequest -SourceDatabase RecoveryDB -SourceStoreMailbox 'Mike Pfeiffer' -TargetMailbox administrator -TargetRootFolder Restore -AllowLegacyDNMismatch

In this example, I am restoring the data from my mailbox in the recovery database to a sub-folder of the administrator mailbox called Restore. Here’s a screen shot of the administrator mailbox after running the above restore command:

Be careful when restoring to alternate mailboxes. If you omit the -TargetRootFolder parameter, the data will be restored and merged into the existing folders in the target mailbox. On the other hand, that might be exactly what you want — if so, just remove the -TargetRootFolder parameter.

Bulk Restores

You might find yourself in a situation where you need to restore data from all mailboxes in a recovery database. For example, let’s say you need to restore the Contacts folder for all of your mailboxes. In this case, you could use a foreach loop to iterate through each mailbox in the recovery database and restore that particular folder to the active mailboxes:

foreach($mailbox in Get-MailboxStatistics -Database RecoveryDB) {
  New-MailboxRestoreRequest -SourceDatabase RecoveryDB -SourceStoreMailbox $mailbox.DisplayName -TargetMailbox $mailbox.DisplayName -SourceRootFolder Contacts
}

This might take a while; you can monitor the progress using the Get-MailboxRestoreRequest with the -Status parameter:

Get-MailboxRestoreRequest -Status Queued

As you’ve seen, there are a lot of steps and multiple options when it comes to restoring data from a recovery database. Obviously, this is not something you want to learn on the fly when a disaster strikes. I’d highly recommend documenting and testing your restore procedure on a regular basis.

Prevent a user from sending and receiving internet mail in Exchange

1. Create a Distribution Group – let’s call it “DG-NoInternetMail”. Add the recipients you want to prevent from sending internet email as members of the group.

2 . Create a Transport Rule

  1. Fire up Exchange console | Organization Configuration | Hub Transport| Transport Rules tab | click New Transport Rule
  2. Enter a name for the rule – e.g. Rule-NoInternetMail
  3. On the Conditions page, select “From a member of a distribution list”
  4. In the rule description, click the link for distribution list (underlined)
  5. Click Add | Select the distribution list “DG-NoInternetMail”
  6. Under Conditions, select a second condition “Sent to users inside or outside the organization”
  7. In the rule description, click Inside (underlined) | change scope to Outside
  8. Click Next
  9. On the Actions page, select “send bounce message to sender with enhanced status code”
  10. If you want to modify the text of the bounced message (optional): In the description, click “Delivery not authorized, message refused” | enter new message text
  11. Click Next | verify the rule conditions and action in the summary
  12. Click New | click Finish

Inbound internet mail: In Exchange Server 2003/2000, you can prevent a recipient from receiving internet mail by requiring authentication to be able to send to the recipient. Internet senders are not authenticated. There are other ways to prevent inbound mail for certain users – like using Recipient Filtering, or generating an invalid email address from a non-existent domain, e.g. foo@nonexistentdomain.corp.

3. Exchange Server 2007 recipients can be set up to require sender authentication to receive email.

Using the Exchange console:
– Recipient Configuration -> select recipient -> recipient properties | Mail Flow Settings tab | Message Delivery Restrictions | Properties
– check “require that senders are authenticated”

Using the shell:

Set-Mailbox “Foo User” -RequireSenderAuthenticationEnabled $true

Additionally, either of the other 2 alternatives mentioned above for Exchange Server 2003/2000 can be used to prevent users from receiving internet email.

Setting delivery restriction based on group membership: Rather than setting up each recipient to receive inbound mail from authenticated senders only, you can get membership of the above distribution group and pipe it into the Set-Mailbox command:

Get-DistributionGroupMember “DG-NoInternetMail” | Set-Mailbox -RequireSenderAuthenticationEnabled $true

4. Use OWA/Outlook to test sending internet mail from a user who is a member of the distribution group.

ASN1 bad tag value met. 0x8009310

Question:
I get CertEnroll::Cx509Enrollment::p_InstallResponse: ASN1 bad tag value met. 0x8009310b on IIS 7 and I am unable to install my certificate.

Answer:
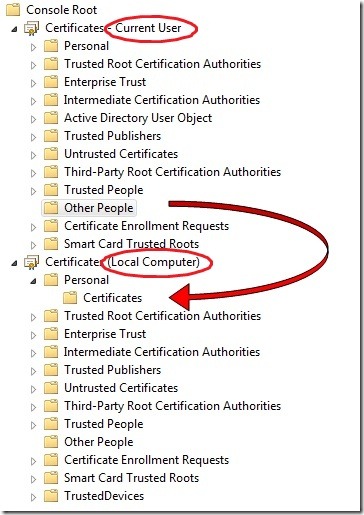
This can be a result of IIS placing the certificate in the wrong certificate store or forgetting where it places the private key, in many cases it gets placed in Other People Certificate store for theCurrent User account. Only certificates that are stored in the Personal Section of the Local Computer store can be used in IIS.

Option #1: Repair a damaged certificate.

  1. Open up DOS prompt (cmd.exe)
  2. Type: certutil -repairstore my “THUMBPRINT/SERIALNUMBER”
    Note: Also, sometimes the certificate is not available and needs to be imported in order for this command to work.
  3. Go back into the IIS Manager and re-edit the bindings for this site. (Where you can select the certificate.
    Note: Sometimes, you will get an error, so just ignore the error and try again. When trying again, the certificate may already be selected and nothing else needs to be done.

Option #2: Restore Certificate to the Local Computer Store

  1. Open the Certificate Snap-In from within the MMC (Microsoft Management Console)
    Start -> Run -> Type “mmc” -> File -> Add/Remove Snap-in -> Add -> Certificates
  2. Add Current User account.
    My User Account -> Finish.
  3. Add Local Computer account.
    Computer account -> Local Computer -> Finish.
  4. Close Add Standalone Snap-in.
  5. Click Ok.
  6. Now you should have a screen similar to this:

  7. Drag the certificate that will not install, out of the Other People store and drop it under theLocal Computer -> Personal -> Certificates.
  8. Do not close out of the MMC at this time.

  9. Open up a command prompt.
    Start -> Run -> Type cmd.
  10. Type: certutil -repairstore my “THUMBPRINT_OF_CERTIFICATE”. (with quotes)
  11. You should now have the private key back on the certificate so now open up IIS and assign it to your website.

Outlook Certificate Errors

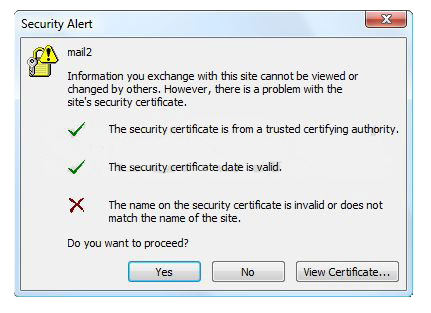
When importing a new certificate into Exchange 2007/2010, you might encounter a certificate error in Outlook 2003/2007/2010. I have included a screenshot of the error I encountered with Outlook 2007 :

When you choose the View Certificate button, it brings up another window that shows you what certificate is in error. In this case, the certificate name is “mail.something.net.”

So the million dollar question? Why the error?

Well, when we install a new certificate, there are a few tasks we want to do. Obviously, we install the certificate for a purpose. This purpose is till allow us to use Exchange services securely. So how do we enable Exchange to use these services? If you are planning to do a very simple configuration and do not care about external Autodiscover access, you do not need to use a Unified Communication Certificate.

So let’s say we have a simple regular common certificate. A certificate with a Common Name (CN) of mail.something.net We install this certificate onto our Exchange box with its’ private key. In our case we were migrating so we did not have to request a certificate via IIS. We just exported it with its’ private key and imported onto the new box. We then assigned this certificate to IIS. Now I went to the Exchange Management Shell and enabled Exchange services to use this certificate. In order to do this, you must run the following commands:

Get-ExchangeCertificate

Thumbprint Services Subject
———- ——– ——-
BCF9F2C3D245E2588AB5895C37D8D914503D162E9 SIP.W CN=mail.something.net.com

What I did was go ahead and enable all new services to use every available service by using the following command:

Enable-exchangecertificate -services IMAP, POP, UM, IIS, SMTP Thumbprint BCF9F2C3D245E2588AB5895C37D8D914503D162E9

The next step would be to ensure the AutodiscoverInternalURI is pointed to the CAS that will be your primary CAS for Autodiscover servicing.

Get-ClientAccessServer -Identity CASServer | FL

AutoDiscoverServiceInternalUri : https://casnetbiosname/Autodiscover/Autodiscover.xml

See the issue here? We are not using a UC certificate that contains the names, “casnetbiosname, casnetbiosname.shudnow.net, mail.something.net, and autodiscover.something.net” Since the Autodiscover directory in IIS will be requring SSL encryption, the url specified in the AutoDiscoverServiceInternalURI must match what is specified in your certificate. You must also ensure there is a DNS record that allows mail.shudnow.net to resolve to your CAS. We should re-configure the AutoDiscoverServiceInternalURI by using the following command:

Set-ClientAccessServer -Identity CASServer -AutoDiscoverServiceInternalUrihttps://mail.something.net/Autodiscover/Autodiscover.xml

We now need to go configure all the InternalURLs for each web distributed service.  If you are going to be utilizing the Autodiscover service from the outside or for non-domain joined clients, you may want to configure an -ExternalURL in addition to your -InternalURL.

Here is the reason why we were receiving the certificate errors. Your InternalURLs most likely are not using mail.shudnow.net. Your InternalURLs are most likely pointed to something such as https://casnetbiosname/ServiceURL which will fail since this is not the CN of your simple certificate.

You can run the following commands to fix your internalURLs so your Outlook 2007 client can successfully take advantage of your web distribution services.

Set-WebServicesVirtualDirectory -Identity “CASServer\EWS (Default Web Site)” -InternalURL https://mail.something.net/EWS/Exchange.asmx -BasicAuthentication:$true

Set-OABVirtualDirectory -Identity “CASServer\OAB (Default Web Site)” -InternalURL https://mail.something.net/OAB

Note: You must ensure that you enable SSL on the OAB directory in IIS which is not on by default. The above command will only enable SSL, but will not ensure 128-bit SSL is required.

Enable-OutlookAnywhere -Server CASServer -ExternalHostname “mail.something.net” -ClientAuthenticationMethod “Basic”-SSLOffloading:$False

Note: The above Enable-OutlookAnywhere command works on SP1. For RTM, substitute -ClientAuthenticationMethod with -ExternalAuthenticationMethod.

Set-ActiveSyncVirtualDirectory -Identity “CASServer\Microsoft-Server-ActiveSync (Default Web Site)” -ExternalURL https://mail.something.net/Microsoft-Server-Activesync

Set-UMVirtualDirectory -Identity “CASServer\UnifiedMessaging (Default Web Site)” –InternalURL https://mail.something.net/UnifiedMessaging/Service.asmx -BasicAuthentication:$true

Note: The above Set-UMVirtualDirectory command is not needed in Exchange 2010.  Exchange 2010 no longer contains a UnifiedMessaging virtual directory and instead uses the Web Services Virtual Directory.

Grant Full Access to All Mailboxes in Exchange 2010

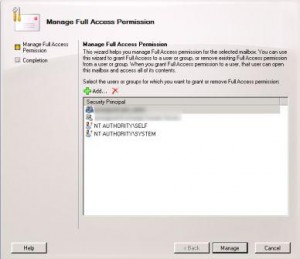
Here’s a little time-saving tip for working with mailboxes in Exchange 2010.  Normally if you need full access to another user’s mailbox in Exchange 2007/2010 you would highlight their mailbox in the Exchange Management Console and the choose “Manage Full Access…” from the action pane.  You would have to do this individually for each mailbox that you wanted to manage full access permissions for.

Here’s an easier way to grant full access to a user for every mailbox in a mailbox database.  Just edit the bracketed fields below and paste the cmdlet in the Exchange Command Shell:

Get-MailboxDatabase -identity “[mailbox database name]” | Add-ADPermission -user [username] -AccessRights GenericAll

Voila!  You now have full access to all mailboxes in the selected database.  This even applies to new accounts created after you run the cmdlet.

NDR and Open Relay Spam Clean Up – Exchange 2000/2003

If you have been the target of an NDR attack* attempt or made an error when configuring your Exchange server and have left yourself an open relay, then you may find that your queues on the Exchange server have a large number of invalid email messages.
* An NDR Attack is where messages are sent to your server with an invalid email address on purpose. Your server then attempts to bounce them back to the sender. The only problem is that the sender has been spoofed and it is that address that is the intended target of the message. These attacks can be avoided with Exchange 2003 and Windows 2003 Service Pack 1 and higher using a new option.Other symptoms include hard disk space is dropping rapidly and the server has become unresponsive. The Exchange logs are much larger than normal.

This article is based on the MS KB 324958 which was written for Small Business Server and MSKB 909005 which is for the full version of Exchange. Some of the techniques have been adjusted based on our experience with following the guides. Original articles:
http://support.microsoft.com/default.aspx?kbid=324958
http://support.microsoft.com/default.aspx?kbid=909005


Find the Problem

Before you start cleaning up the server, you need to find the source of the problem and deal with it.

Check Whether the Exchange Server is an Open SMTP Relay using a Telnet Test

A Telnet test involves establishing a Telnet session from a computer that is not located on the local network to the external (public) IP address of the Exchange server. You need to carry out the test from a machine at home, or from another office. Doing the test from a machine on your own network will produce useless results.

  1. Start a command prompt.
    Either click start, run and type CMD
    or Choose Command Prompt from Start, Programs, Accessories, Command Prompt
  2. Type “telnet” (minus quotes) and press enter.
  3. At the Telnet prompt, type

    set localecho

    (minus quotes) and press enter. This lets you see what is going on.

  4. Still in the telnet prompt, enter the following command and then press enter

    open 111.222.333.444 25

    where 111.222.333.444 is your Exchange server’s external IP address

  5. You should get a response back similar to the following:

    220 mail.server.domain Microsoft ESMTP MAIL Service, Version: 6.0.2790.0 Ready at

  6. Type the following command in to the telnet windows:

    ehlo testdomain.com

    and press enter (note “testdomain.com” can be anything that isn’t a domain that the Exchange server is responsible for.

  7. After pressing OK you should get a response back

    250 OK

  8. Type the following command in to the telnet window:

    mail from:address@testdomain.com

    and press enter (again where address@testdomain is an email address that is not on the Exchange server. Note the lack of space between from and the first part of the address).

  9. After pressing OK you should get a response back:

    250 2.1.0 address@testdomain.com….Sender OK

  10. Type the following command in to the telnet window:

    rcpt to:address@anotherdomain.com

    and then press enter (where address@anotherdomain.com is not either an address you use internally or the address you entered earlier as the from. Once again note the lack of space between to and the first part of the e-mail address).

  11. After pressing enter you will get one of two responses.
    If you get

    550 5.7.1 Unable to relay for address@anotherdomain.com

    then you are relay secure.
    However if you get

    250 2.1.5 address@anotherdomain.com

    Then you are an open relay.

What now?

There are two parts of the Exchange that can make your Exchange server an open relay, the Default SMTP Virtual Server and SMTP connectors. You need to check both to ensure that you haven’t configured them wrongly and turned your machine in to a spammers target.

Default SMTP Virtual Server

To check or correct the configuration of the Default SMTP Virtual Server:

  1. Start Exchange System manager (ESM)
  2. Expand Servers, <your server>, Protocols, SMTP.
  3. Right click on “Default SMTP Virtual Server” and choose Properties.
  4. Click on the “Access” Tab.
  5. There are four buttons, click on “Relay…” at the bottom.
  6. Ensure that “Only the list below” is enabled and the list is empty.
  7. If you don’t have users sending email through your email server with Outlook Express or another POP3 client then you can disable “Allow all users that successfully authenticate to relay regardless of the list above”.
  8. Apply/OK until all windows are closed.

SMTP Connections

  1. Start ESM, then open Connectors.
  2. Right click on each SMTP Connector in turn and choose Properties.
  3. Click on the “Address Space” tab.
  4. If you have a “*” in the address list, check that “Allow messages to be routed to these domains” is not enabled.
  5. Apply/OK until all windows are closed.

Once you have made the changes, restart the SMTP server service and then repeat the telnet test above to ensure that you have closed everything.


Check Whether an Authenticated User is Relaying

This technique requires the Windows Event Viewer to determine whether a user is trying to use the SMTP service in Exchange to send email. If you have disabled the authenticated user option already then this isn’t an issue.

  1. Start ESM.
  2. Expand Servers and then right click on your server and choose Properties.
  3. Click on the “Diagnostic Logging” tab.
  4. In the list of “Services” on the right, find “MSExchangeTransport”.
  5. In the resulting list choose “SMTP Protocol”.
  6. Below the list, change the “Logging Level” to Maximum and click Apply.
  7. Repeat for “Authentication”
  8. Press Apply/OK to close Server Properties.

You now need to watch the Event Logs on the Exchange server. In the application log you will see something similar to the following which can indicate that a user is trying to send email through the SMTP interface.

Event Type: Information
Event Source: MSExchangeTransport
Event Category: SMTP Protocol
Event ID: 1708
Date: 30/08/2004
Time: 15:45:08
User: N/A
Computer: EXCH-SRV1
Description: SMTP Authentication was performed successfully with client test-pc1. The authentication method was LOGIN and the username was domain\username.

If the account being used is “Guest” then you need to disable the Guest account.
If it is another account then you need to either change the password or disable the account.

Ideally you do not want any kind of relaying going on. The best option if this is happening is to disable the feature altogether. If this isn’t practical for business reasons, then you need to secure it as best you can.

The Administrator Account is the most common target

Note that the most common account that is used for this type of attack is the Administrator account. Therefore if you suspect that that the administrator account is being abused, then change its password and restart the SMTP Server Service to ensure that the new credentials are used. The administrator account is attacked because it doesn’t lock out.


Check whether you are under an NDR Attack

If you are under an NDR attack, then you will find lots of messages in the queues of the server. These messages have special characteristics which make them easy to spot.

  1. Start Exchange System Manager.
  2. Go to Servers, <your server>, Queues in Exchange 2003, or down to Protocols, SMTP in Exchange 2000.
  3. Select a queue that contains many messages, click Find messages, and then click Find Now.
  4. In the Sender field of the messages will be an address. If it is postmaster@ your domain then the message is an NDR. You can view the recipient of the NDR by double clicking on the message.

Note: If you are using an SMTP Connector to route email through your ISP using a smart host, then you cannot detect this type of attack. The messages are sent straight out to the ISP by your server. If your ISP has alerted you that there may be a problem, you will need to use message tracking and the SMTP log to detect the cause of the attack.

If you are on Exchange 2003 with Windows 2003 then you can stop an NDR attack by using recipient filtering and the tar pit option in Windows 2003. You will still need to clean the queues using the techniques outlined, but it will stop further traffic.

If you are on Exchange 2003 on Windows 2000 then you should NOT enable recipient filtering as this exposes your server to a directory harvest attack.
Exchange 2000 users do not have any kind of recipient filtering options available to them.
Therefore you should look at a third party tool that can do the filtering for you, often referred to as an LDAP lookup. Vamsoft ORF has Active Directory filtering and has a 30 day trial version.


Cleaning up the Server

Once you have found out the cause of the problem and dealt with it, then you need to clean up the server.

Block port 25 on your firewall/router so that SMTP traffic is not coming in while you cleaning the server. This stops new messages, both spam and valid messages and also ensures that nothing you want is lost while you clean up the server. As long as you do not leave the port closed for longer than 48 hours then genuine inbound email will still be delivered.

When following this procedure you should note that it can take NUMEROUS ATTEMPTS OVER MANY HOURS before the queues are clear. Exchange System Manager is notorious for being unable to show the true extent of the queues when it has been abused in this way, so messages can continue to appear even after you think you have cleaned the queues.

Cleaning Up the Exchange Server’s SMTP Queues

Warning: This process will delete all email that is due to go to external recipients. Internal messages are not affected, neither are new inbound messages from the Internet unless they are from the spammer continuing to try and abuse your server.

Capturing the Messages Into a Single Queue

This process requires an SMTP connector for all addresses. If you don’t already have one (with a * on the namespace tab) then you need to create one using the instructions below.
If you already have an SMTP Connector with a * on the namespace tab, then you can use it for this process. You will need to adjust the settings as appropriate. You may wish to just make a note of the settings, delete the connector and create a new one for this process. When complete recreate your live connector.

  1. In ESM, Connectors.
  2. Right click on connectors and choose New, SMTP Connector.
  3. On the “General Tab” type a name for the connector. “Spam Cleanup” or similar.
  4. Click the “Add” button under “Local Bridgeheads” and choose your Exchange server.
  5. Click on the “Address Space” tab.
  6. Click “Add” and choose SMTP. Leave each setting (* and cost of 1) and press ok.
    If all the spam is to one domain, then you could remove the * and enter the domain that the messages are being sent to. This should leave legitimate messages in the queue.
  7. Click on the General tab again. Change the option in the centre from DNS to “Forward all mail through this connector to the following smart hosts”.
  8. Enter an invalid IP address in square brackets:  [99.99.99.99].
  9. Click on the “Delivery Options” tab and ensure that “Specify when messages are sent through this connector” is selected.
  10. Change the option to 11pm. (If it is close to 11pm when you are doing this, use a much earlier time – 6am or similar. The time doesn’t matter as long as it is not close).
  11. Press Apply/OK to close the SMTP Connector dialogue.
  12. Restart SMTP Virtual Server.
    1. Expand Servers, <your server>, Protocols, SMTP.
    2. Right click on the “Default SMTP Virtual Server”
    3. Choose “Stop”. This may take a few minutes.
    4. Once it has stopped, right click again and choose “Start”.

The Exchange SMTP virtual server is now processing all the messages and placing them in to a single queue for your SMTP connector. This can take some time. You may want to wait until the number of messages in the queue stays constant before attempting the next stage.

Exchange 2000: The queues can be found in Servers, <your server>, Protocols, SMTP.

Exchange 2003: The queues can be found in Servers, <your server>, Queues.

You may also find the Servers listed under an administrative group.

To locate the required queue, look for a small red clock on the yellow icon. This indicates that it is on a timed delivery.

Deleting the Messages

Now that the messages are in one queue, it is quite easy to delete them

Exchange 2003

  1. Right click on this connector and choose “Find Messages”.
  2. In the drop down box select the number of messages to be listed in the search.
  3. Click “Find Now”.
  4. Once the search is complete, select all of the messages (use the shift-page down key combination)
  5. Then click “Delete all Messages (No NDR).

Exchange 2000

  1. Right click on this connector and choose “Delete All Message (No NDR)”
  2. Select Yes when asked if you want to delete all the messages in the queue.

Once the messages have been deleted, which could take some time, refresh the queues to ensure that they don’t continue to build. If they do then Exchange is still processing the messages. You will need to repeat the procedure to delete more messages until the queues are completely clear and stay at zero.

Once you have flushed out the messages, undo the changes that you have made.

If it was a new SMTP connector, delete it.
If you adjusted an existing connector, put the settings back how they were. Don’t forget the time on the “Delivery Options” tab. it should be “Always Run”.

Finally restart SMTP virtual server to get Exchange to start using the new settings.

If you closed port 25 during this process, then remember to open it up again.

Alternative Queue Clean Up Method

If you have a very large number of messages, then there is a command line tool that you can get from Microsoft.

ftp://ftp.microsoft.com/pss/Tools/

Then go in to the folders: Exchange Support Tools / Aqadmcli
(Due to the use of spaces in the folder names, a direct link isn’t possible)

After downloading the utility use the following command to clear all the queues.

aqadmcli delmsg flags=all


Clear up “Bad Mail” (Exchange 2000 or Exchange 2003 without SP1)

Messages that have been stuck in the queue but cannot deliver will usually end up in the “badmail” folder. This folder can take up a lot of space. You should remove the content of this folder to free up some valuable space.

Exchange 2003 SP1 and higher does not use the Badmail folder unless you specifically enable it via registry hack.

  1. Locate the Badmail folder
    The default location is C:\Program Files\Exchsrvr\Mailroot\Vsi 1
  2. DO NOT OPEN THE BADMAIL FOLDER. It may contain a large amount of messages which could make the server unresponsive.
  3. Right click on the folder “Badmail” and choose “Rename”. Give it a new name.
  4. While holding down the shift key, press the “Delete” key on your keyboard. Click yes to delete the contents immediately. Holding down shift bypasses the recycle bin, so make sure that you have selected the right folder.
  5. Exchange will recreate the “Badmail” folder when it needs to.

There are various techniques for dealing with the badmail folder. This blog posting outlines a useful script that you can use to do it for you:http://hellomate.typepad.com/exchange/2003/07/dealing_with_ba.html


Email Blacklists

If you were an open relay then you may have ended up on some of the blacklists. When the message bounces back you will get a reason code which should include which blacklist has rejected you.
To get off the blacklist you will have to find their web site and follow their procedure.

As a short term measure, setup an SMTP connector to send all your email via your ISPs SMTP server.

Using Email Blacklists (Exchange 2003 ONLY)

If you want to use an Email Blacklist yourself, then you will need to setup filtering. This article at MS tells you how:
http://support.microsoft.com/default.aspx?kbid=823866

Those of you using an older version of Exchange will have to use a third party tool – whether this is commercial or open source. Vamsoft’s ORF has blacklist support.