How to install AirPort Utility 5.6.1 on Mountain Lion

Just in case you’d like to use AirPort Utility 5.6.1 on Mountain Lion (and probalby Lion as well), here’s how to install it:

1. Download the disk image (its here: http://support.apple.com/kb/DL1536).

2. Mount the disk image and drag the install package (AirPortUtility.pkg) to your desktop.

3. Fire up Terminal and prepare to show off…

4. Make a temporary directory and cd into it: mkdir tmp ; cd tmp

5. Extract the Payload file from the install package with xar, here’s the command: xar -x -f ~/Desktop/AirPortUtility.pkg Payload

6. The result will be a directory named AirPortUtility.pkg (just like the file, but now you can move into it to get the files you want). Inside will be a file called Payload that is a compressed archive of AirPort Utility.app.

7. So our next move is to extract the app. Here’s the command: gzcat AirPortUtility.pkg/Payload | tar -xf –

8. When it finished there will be three new folders Applications, Library, and System. Your nice new copy of AirPort Utility 5.6.1 will be in the Utilities folder inside of the Applications folder. Use Finder to rename it (assuming you want to keep version 6 as well) then drag it to your Applications/Utilities folder.

9. The other two folders hold the AirPort Base Station Agent and its supporting files. I’m not sure if you need/want these or not. As best I can figure the agent does two things: it checks for updates for AirPort Utility and it monitors AirPort base stations for problems. You probably already have a version running as it comes with the system and it seems to know how to talk to both versions of AirPort Utility (I got nagged about updating).

10. The final step is to launch AirPort Utility and confirm that it works. You’ll probably want to go into preferences and turn off the option to check for updates. If all is good you can remove the temporary directory: cd .. ; rm -rf tmp (or drag it into the trash with Finder).

Password Protect Zip Files in Mac OS X

Creating a password protected zip file is easy in Mac OS X and does not require any add-ons or downloads. Instead, use the zip utility that is bundled with all Macs.

If you’re familiar with the command line, the syntax of the encrypted zip command is as follows:
zip -e [archive] [file]

If you’re not sure how to use that, read on to learn how to create zip archives encrypted with passwords. These encrypted zip files will maintain password protection across platforms, meaning you can send a protected zip file to a Windows user and they will still need to enter the password in order to view the contents.

Set a Zip Password in Mac OS X

You can create password protected archives of files and folders:

    1. Launch the Terminal from the Applications > Utilities folder
    2. Type the following command:

zip -e archivename.zip filetoprotect.txt

  1. Enter and verify the password – don’t forget this

The resulting archive, in this case named “archivename.zip”, is now encrypted with the password provided. The file that was encrypted, “filetoprotect.txt”, is now inaccessible without entering that password.

Example: Zipping a Folder and Setting a Password
Here is an example of what this will look like from the command line, in this case we are compressing and password protecting the entire ‘Confidential’ folder located within the users /Documents directory, and the password protected zip is being placed on the users desktop for easy access:
$ zip -e ~/Desktop/encrypted.zip ~/Documents/Confidential/
Enter password:
Verify password:
adding: ~/Documents/Confidential/ (deflated 13%)

Notice the password will not display, this is normal behavior for the Terminal.

Opening the Password Protected Zip

Despite being created at the command line, you do not need to unzip the file from the terminal, it can be expanded from the Mac OS X Finder or within Windows using standard unzipping apps. Just double click on the file, enter the password, and it will decompress. You can also decompress the zip archive from the command line with:
unzip filename.zip

Here are some use cases for password protected zip archives:

  • Password protecting an individual file or directory
  • Sending a sensitive and encrypted file over an unencrypted network
  • Emailing confidential data to a Windows user
  • Adding an additional layer of security to a hidden folder
  • Password protecting your own backups, outside of Time Machine

Start the Network and Internet Troubleshooting Wizards from the Command-Prompt

The network and Internet troubleshooting wizards can also be started from the command line, using the parameters below. All you need is to copy and paste these commands in the Run window (press the Windows key + R) or in the Command Prompt:

  • To open the Internet Connections troubleshooter:msdt.exe -id NetworkDiagnosticsWeb
  • To open the Shared Folders troubleshooter:msdt.exe -id NetworkDiagnosticsFileShare
  • To open the HomeGroup troubleshooter:msdt.exe -id HomeGroupDiagnostic
  • To open the Network Adapter troubleshooter:msdt.exe -id NetworkDiagnosticsNetworkAdapter
  • To open the Incoming Connections troubleshooter:msdt.exe -id NetworkDiagnosticsInbound

Item Recovery in Exchange 2010

Exchange 2010 includes the capability to ensure that deleted items are retained within the dumpster till the deleted item retention period. This prevents accidentally or maliciously deleted items from being deleted permanently, and allows an administrator to recover such items. This feature is known as Single Item Recovery and it enables organizations to change their backup paradigms (i.e., you no longer need to maintain backups for single item recovery), and to retain and allow discoverability of the data to meet compliance requirements.

Essentially there are two steps:

  1. Search – Determining the location of the missing items.
  2. Recovery – Retrieving the missing items.

Remember, in order to discover and recover the data, each mailbox needs to have Single Item Recovery enabled prior to the accidental purge event. Therefore, we recommend enabling Single Item Recovery for mailboxes as part of the Exchange 2010 upgrade process.

The Scenario

Ross sent his administrative assistant, Julie, a message regarding his upcoming trip to Seattle, specifically requesting Julie to book his itinerary. Unfortunately, before she could work on Ross’ request, Julie shift-deleted the message while cleaning out her mailbox. Like most users, Julie has done this before and is familiar with the Recover Deleted Items capability within Outlook. However, this time, Julie made the mistake of clicking the delete button for the message in question instead of clicking the recover button. Panicking, Julie calls Help Desk to request recovery of the item.

Step 1: Search

The help desk ticket results in a workflow process that is performed by an IT administrator who has necessary rights to perform searches (in this scenario, the Help Desk technician’s user account has been delegated the Discovery Management role).

Note: By default, no accounts have the ability to perform mailbox searches. You can either create a custom role group to allow an administrator to search only a subset of mailboxes, or add the administrator to the Discovery Management built-in role group (which allows them to search all mailboxes in the Exchange organization) by using the following command:
Add-RoleGroupMember “Discovery Management” -Member <user account>

The Help Desk technician has two choices for performing discovery, and the choice will depend on the target user’s client access license (CAL):

  1. If the users included in the search have Standard CALs, the Help Desk technician can only use the Search-Mailbox cmdlet.
  2. If the users included in the search have Enterprise CALs, the Help Desk technician can also use the New-MailboxSearch cmdlet, or the Multi-Mailbox Search feature in the Exchange Control Panel (ECP).

In Julie’s case, she provided the Help Desk technician with the following information:

  • The message was sent from her boss.
  • The message contains the word “Seattle”.

Searching messages by using Search-Mailbox

When a mailbox with a Standard CAL will be searched, the Search-Mailbox cmdlet will be used. The Search-Mailbox cmdlet requires the following information:

  • The mailbox to be searched
  • The search query criteria
  • The mailbox and folder where the results will be placed
  1. Knowing this information, the Help Desk technician executes the following command from the Shell:Search-Mailbox sec -SearchQuery “from:’boss’ AND seattle” -TargetMailbox “Discovery Search Mailbox” -TargetFolder “Secretary Recovery” -LogLevel FullNote: Search-Mailbox does not allow the target mailbox to be the same as the source mailbox. Search-Mailbox does allow you to be very specific in your search criteria. Besides scoping the search with the SearchQuery parameter using Advanced Query Syntax (AQS), in Exchange 2010 SP1 you can also use the SearchDumpsterOnly switch to search only items in the dumpster.The Help Desk technician receives the following output:RunspaceId : fb25cadf-a63f-4e88-8567-cb4ae1b30ade
    Identity : corp.contoso.com/Users/Secretary
    TargetMailbox : corp.contoso.com/Users/DiscoverySearchMailbox {D919BA05-46A6-415f-80AD-7E09334BB852}
    TargetPSTFile :
    Success : True
    TargetFolder : \Secretary Recovery\Secretary-4/14/2010 6:28:33 AM
    ResultItemsCount : 1
    ResultItemsSize : 1.577 KB (1,615 bytes)
  2. The Help Desk technician then logs into OWA and opens the Discovery Search Mailbox via the Open Other Mailbox option:Note: The OWA and ECP screenshots are from Exchange 2010 SP1. These are preliminary screen shots from pre-Beta software that are subject to change before the final release of SP1.
  3. The Help Desk technician navigates the folder structure within the Discovery Search Mailbox and verifies that he has recovered the item in question:

Searching messages by using Multi-Mailbox Search

When a mailbox with an Enterprise CAL will be searched, the administrator can use the Multi-Mailbox Search feature in the Exchange Control Panel. The Help Desk technician takes the following steps:

  1. He launches the Exchange Control Panel via https://mail.contoso.com/ecp and logs on using his credentials.
  2. From the Options drop-down, he selects Manage My Organization.
  3. He clicks on Service Level and selects the Mailbox Searches applet.
  4. He clicks New to create a new search request which requires at least the following information:
    1. The search query criteria
    2. The mailbox to be searched
    3. The mailbox and folder where the results will be placed
  5. When the results are obtained, he can either click on the [Open] link in the Mailbox Searches Results pane, or open the Discovery Search Mailbox via the Open Other Mailbox option from within OWA.
  6. He navigates the folder structure within the Discovery Search Mailbox and verifies that he has recovered the item in question:

Step 2: Recovery

At this point the Search phase is complete and the Recovery phase begins. There are two options for how to recover and return the item back to the user and it depends on the version of Exchange 2010 you have deployed:

  1. If you are running Exchange 2010 RTM or later, you can utilize the Search-Mailbox cmdlet to restore the item back to the user.
  2. If you are running Exchange 2010 SP1, you can utilize the PST import and export cmdlets to restore the item back to the user.

Search-Mailbox Recovery Process

  1. The Help Desk technician executes the following command from the Shell:Search-Mailbox “Discovery Search Mailbox” -SearchQuery “from:’boss’ AND seattle” -TargetMailbox sec -TargetFolder “Recovered by HelpDesk” -LogLevel Full -DeleteContentHe receives the following output:RunspaceId : fb25cadf-a63f-4e88-8567-cb4ae1b30ade
    Identity : corp.contoso.com/Users/DiscoverySearchMailbox {D919BA05-46A6-415f-80AD-7E09334BB852}
    TargetMailbox : corp.contoso.com/Users/Secretary
    TargetPSTFile :
    Success : True
    TargetFolder : \Recovered by HelpDesk\Discovery Search Mailbox-4/14/2010 6:32:49 AM
    ResultItemsCount : 1
    ResultItemsSize : 1.577 KB (1,615 bytes)
  2. He notifies Julie that the item is recovered. Julie logs into her mailbox and verifies she has the correct item:

It’s important to note that due to the two-step process involved with Search-Mailbox (copying the results to the Discovery Mailbox and then copying the results back to the user’s mailbox) the hierarchy is same for the end user – the root of the Discovery Search Mailbox, as well as the folder target that was used to place the item in the Discovery Search Mailbox, are both visible.

PST Export/Import Recovery Process

Exchange 2010 SP1 includes infrastructure that allows administrators to perform bulk import and export of PST files without requiring the installation of the Outlook client. This infrastructure, supported by the cmdlets *-MailboxImportRequest and *-MailboxExportRequest, leverages the Mailbox Replication Service and the framework that exists for moving mailboxes between databases (see Understanding Move Requests for more information).

To use this functionality, two prerequisites must be met:

  1. The person performing the import or export must have the appropriate permissions within Exchange. By default, no RBAC role group provides this functionality. To grant the ability for a help desk administrator, compliance officer, or Exchange administrator to perform bulk import/export capabilities against all mailboxes, the following commands must be executed:New-RoleGroup “Mailbox Import-Export Management” -Roles “Mailbox Import Export”
    Add-RoleGroupMember “Mailbox Import-Export Management” -Member <user account>The first command creates a new role group that grants access to the *-MailboxImportRequest and *-MailboxExportRequest cmdlets. The second command adds a user to the role group.
  2. The Exchange Trusted Subsystem security group must have Full Control/Owner permissions on the file share that will be used to temporarily store the PST files.

In this scenario, the Help Desk technician is a member of the Mailbox Import-Export Management role group and thus can utilize the Import and Export cmdlets. The Help Desk technician:

  1. Runs the following command from the Shell to export the recovered data from the Discovery Search Mailbox to a PST file:New-MailboxExportRequest -Mailbox “Discovery Search Mailbox” -FilePath “\\exchsvr\HelpDeskPst\SecretaryRecovery.pst” -ContentFilter {Subject -eq “april travel plans”} -SourceRootFolder “Secretary Recovery”
  2. Runs the following command from the Shell to import the recovered data into Julie’s mailbox:New-MailboxImportRequest -Mailbox sec -FilePath “\\exchsvr\HelpDeskPst\SecretaryRecovery.pst” -TargetRootFolder “Recovered By HelpDesk”
  3. Notifies Julie that the item is recovered.

At this point, Julie logs into her mailbox and verifies she has the correct item:

Conclusion

Exchange 2010 provides you the means to ensure data is not deleted from the system prior to the expiration of its deleted item retention. In the event that a message is accidentally or maliciously purged from the user’s dumpster, it can be easily recovered and restored using built-in tools.

Export exchange mailbox to PST (Exchange PowerShell)

If you want to export or backup a user mailbox to a PST file to import to Microsoft Outlook, you need a machine running Microsoft Operating System 32 bit version with Microsoft Outlook installed or MAPI component, on the same domain of the Exchange Server.

On this machine, you need to install Microsoft Exchange Management Server (you can find this on the Microsoft Exchange CD installation wizard) or download (2007 version) from: http://www.microsoft.com/downloads/details.aspx?displaylang=en&FamilyID=6be38633-7248-4532-929b-76e9c677e802.

First you need to grant yourself permission’s on this database:

Get-mailbox -database ‘SERVERNAME.DOMAIN.LOCALdatabaseName’ | Add-MailboxPermission -User “danielcosta” -AccessRights FullAccess

After this, open Exchange PowerShell and run this command (change what you need) to backup a single mailbox:

Export-Mailbox -id username -PSTFolderPath E:folder

If you want to backup all users in a Exchange Database to a folder you can run this:

Get-mailbox -database ‘SERVERNAME.DOMAIN.LOCALdatabaseName’ | Export-Mailbox -PSTFolderPath c:folder

How to find – Size of a directory & Free disk space

‘du’ – Finding the size of a directory

$ du
Typing the above at the prompt gives you a list of directories that exist in the current directory along with their sizes. The last line of the output gives you the total size of the current directory including its subdirectories. The size given includes the sizes of the files and the directories that exist in the current directory as well as all of its subdirectories. Note that by default the sizes given are in kilobytes.

$ du /home/david
The above command would give you the directory size of the directory /home/david

$ du -h
This command gives you a better output than the default one. The option ‘-h’ stands for human readable format. So the sizes of the files / directories are this time suffixed with a ‘k’ if its kilobytes and ‘M’ if its Megabytes and ‘G’ if its Gigabytes.


$ du -ah

This command would display in its output, not only the directories but also all the files that are present in the current directory. Note that ‘du’ always counts all files and directories while giving the final size in the last line. But the ‘-a’ displays the filenames along with the directory names in the output. ‘-h’ is once again human readable format.

$ du -c
This gives you a grand total as the last line of the output. So if your directory occupies 30MB the last 2 lines of the output would be

30M .
30M total

The first line would be the default last line of the ‘du’ output indicating the total size of the directory and another line displaying the same size, followed by the string ‘total‘. This is helpful in case you this command along with the grep command to only display the final total size of a directory as shown below.

$ du -ch | grep total
This would have only one line in its output that displays the total size of the current directory including all the subdirectories.

Note : In case you are not familiar with pipes (which makes the above command possible) refer to Article No. 24 . Also grep is one of the most important commands in Unix. Refer to Article No. 25 to know more about grep.

$ du -s
This displays a summary of the directory size. It is the simplest way to know the total size of the current directory.

$ du -S
This would display the size of the current directory excluding the size of the subdirectories that exist within that directory. So it basically shows you the total size of all the files that exist in the current directory.

$ du –exculde=mp3
The above command would display the size of the current directory along with all its subdirectories, but it would exclude all the files having the given pattern present in their filenames. Thus in the above case if there happens to be any mp3 files within the current directory or any of its subdirectories, their size would not be included while calculating the total directory size.

‘df’ – finding the disk free space / disk usage

$ df
Typing the above, outputs a table consisting of 6 columns. All the columns are very easy to understand. Remember that the ‘Size’, ‘Used’ and ‘Avail’ columns use kilobytes as the unit. The ‘Use%’ column shows the usage as a percentage which is also very useful.

$ df -h
Displays the same output as the previous command but the ‘-h’ indicates human readable format. Hence instead of kilobytes as the unit the output would have ‘M’ for Megabytes and ‘G’ for Gigabytes.

Most of the users don’t use the other parameters that can be passed to ‘df’. So I shall not be discussing them.

I shall in turn show you an example that I use on my machine. I have actually stored this as a script named ‘usage‘ since I use it often.

Example :

I have my Linux installed on /dev/hda1 and I have mounted my Windows partitions as well (by default every time Linux boots). So ‘df’ by default shows me the disk usage of my Linux as well as Windows partitions. And I am only interested in the disk usage of the Linux partitions. This is what I use :

$ df -h | grep /dev/hda1 | cut -c 41-43

This command displays the following on my machine

45%

Basically this command makes ‘df’ display the disk usages of all the partitions and then extracts the lines with /dev/hda1 since I am only interested in that. Then it cuts the characters from the 41st to the 43rd column since they are the columns that display the usage in % , which is what I want.

Create a password protected zip file in Mac

To create password protected zip file in Mac, follow the steps below:-

  • Go to Finder -> Application -> Terminal
  • now change directory to the plance you wan to zip and enter the command below:-
    $ zip -e myzipfile.zip file1.txt file2.txt
  • Once you enter the command, system will prompt you for password twice. Just enter the password you wish to set, and it’s done!
  • You should see myzipfile.zip appear in the directory.


BOOTMGR is missing


Cause:

This error occurs when either of the following conditions is true:

  • The Windows Boot Manager (Bootmgr) entry is not present in the Boot Configuration Data (BCD) store.
  • The Boot\BCD file on the active partition is damaged or missing.

Resolution:

Method 1: Repair the BCD store by using the Startup Repair option

You can use the Startup Repair option in the Windows Recovery Environment to repair the BCD store. To do this, follow these steps:

  1. Put the Windows Vista installation disc in the disc drive, and then start the computer.
  2. Press a key when you are prompted.
  3. Select a language, a time, a currency, and a keyboard or another input method, and then click Next.
  4. Click Repair your computer.
  5. Click the operating system that you want to repair, and then click Next.
  6. In the System Recovery Options dialog box, click Startup Repair.
  7. Restart the computer.

Method 2: Rebuild the BCD store by using the Bootrec.exe tool

If the previous method does not resolve the problem, you can rebuild the BCD store by using the Bootrec.exe tool in the Windows Recovery Environment. To do this, follow these steps:

  1. Put the Windows Vista installation disc in the disc drive, and then start the computer.
  2. Press a key when you are prompted.
  3. Select a language, a time, a currency, and a keyboard or another input method, and then click Next.
  4. Click Repair your computer.
  5. Click the operating system that you want to repair, and then click Next.
  6. In the System Recovery Options dialog box, click Command Prompt.
  7. Type Bootrec /RebuildBcd, and then press ENTER.
    • If the Bootrec.exe tool runs successfully, it presents you with an installation path of a Windows directory. To add the entry to the BCD store, type Yes. A confirmation message appears that indicates the entry was added successfully.
    • If the Bootrec.exe tool cannot locate any missing Windows installations, you must remove the BCD store, and then you must re-create it. To do this, type the following commands in the order in which they are presented. Press ENTER after each command.
      Bcdedit /export C:\BCD_Backup
      ren c:\boot\bcd bcd.old
      Bootrec /rebuildbcd
  8. Restart the computer.

Method 3: Rebuild the BCD store manually by using the Bcdedit.exe tool

If the previous method does not resolve the problem, you can rebuild the BCD store manually by using the Bcdedit.exe tool in the Windows Recovery Environment. To do this, follow these steps:

  1. Put the Windows Vista installation disc in the disc drive, and then start the computer.
  2. Press a key when you are prompted.
  3. Select a language, a time, a currency, and a keyboard or another input method, and then click Next.
  4. Click Repair your computer.
  5. Click the operating system that you want to repair, and then click Next.
  6. In the System Recovery Options dialog box, click Command Prompt.
  7. Type the following command, and then press ENTER:
    cd /d Partition:\Windows\System32

    Note Partition represents the letter of the partition on which Windows Vista is installed. Typically, this is partition C.

  8. Type the following command, and then press ENTER:
    bcdedit /enum all

    In the Windows Boot Loader section of the output from this command, note the GUID that is listed for resumeobject. You will use this GUID later.

  9. Type the following command, and then press ENTER:
    bcdedit -create {bootmgr} -d “Description

    Note Description represents the description for the new entry.

  10. Type the following command, and then press ENTER:
    bcdedit -set {bootmgr} device partition=Partition:

    Note Partition represents the letter of the partition. Typically, the letter is C.

  11. Type the following command, and then press ENTER:
    bcdedit /displayorder {GUID}

    Note GUID represents the GUID that you obtained in step 8.

  12. Type the following command, and then press ENTER:
    bcdedit /default {GUID}

    Note GUID represents the GUID that you obtained in step 8.

  13. Type the following command, and then press ENTER:
    bcdedit /timeout Value

    Note Value represents the time in seconds before the Windows Boot Manager selects the default entry that you created in step 12.

  14. Restart the computer.

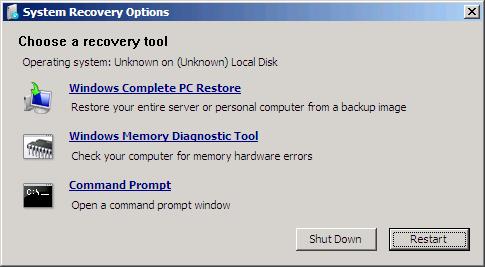
If you are booting from a Server 2008 install disk, when you use the “Repair your computer” option, the available options look like this:

You can access the repair option on a Server 2008 disk by choosing “command prompt”, then running  “x:\sources\recovery\StartRep.exe”.


Fix Temporary Profile in Windows 7 Issue

1)      Log in with temp profile.

2)      Start registry editor by typing regedit in find box in Windows 7.

3)      Navigate the following location in Windows 7.

Fix Temporary Profile in Windows 7

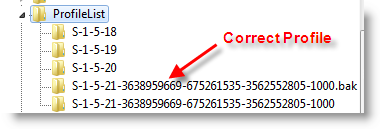
4)      You can see similar keys under profile list with .bak difference, as shown below.

Fix Temporary Profile in Windows 7

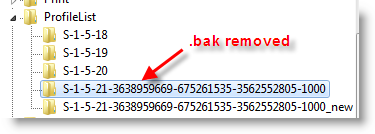
5)      You correct profile key is marked as bak. Currently your Windows 7 computer logged in with fresh profile with same key. So, rename the new profile key ( which is not having.bak) and remove .bak from correct profile key. See below.

Fix Temporary Profile in Windows 7

6)      That’s it. Log off and log in with your user name and password. You must get your icons and profile settings back in Windows 7. This is very simple and easy method to fix temp profile in Windows 7  issue.