Windows 10 VPN Flyout – no connect button

Windows 10 VPN has gone back in time, when you click your network icon in the system tray, and click one of your VPN connections, it opens a window with all the VPN connections.

Want it back like it was in Windows 8


  1. Open regedit (WIN+R and type regedit.exe)
  2. Navigate to HKEY_LOCAL_MACHINE\Software\Microsoft\Windows\CurrentVersion\Control Panel\Settings\Network
  3. Take ownership of the “Network” key/folder (right click, Permissions)
  4. Select “Advanced” in the Permissions window
  5. In the Advanced window, select “Change” where the owner field is (at the top of the window)
  6. Type in your username and save your changes.
  7. Close the advanced window
  8. Now select “Administrators” in the security tab
  9. Make sure “Full control” is selected, then apply changes
  10. Now that’s done, double click “ReplaceVan”
  11. Change it’s value to 2

Now try your network Icon in system Tray, a lost feature has now returned


Forgot Windows 10 password

If you forgot the password for your Microsoft account and you were unable to reset the password with Microsoft’s online recovery methods, the best way is to create a new local account so you can sign in again to your Windows 10 computer. This method will also allow you to access all of your Microsoft account’s local files.

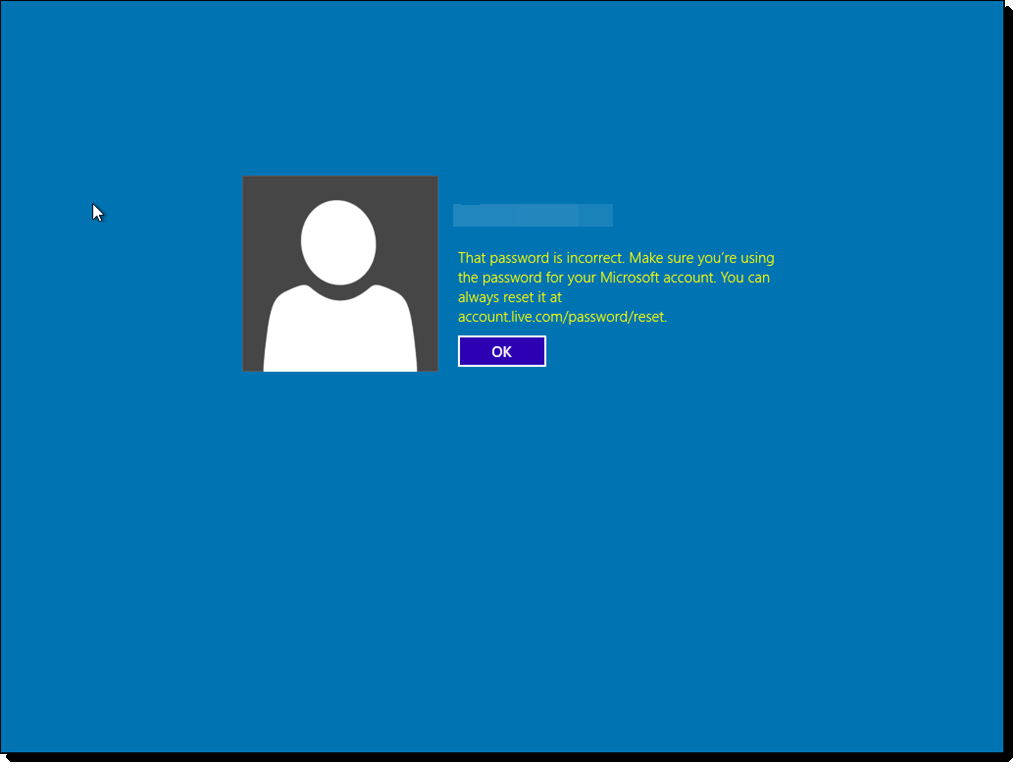
pswd-1

This password is incorrect

Following are the steps to reset a Windows 10 password:

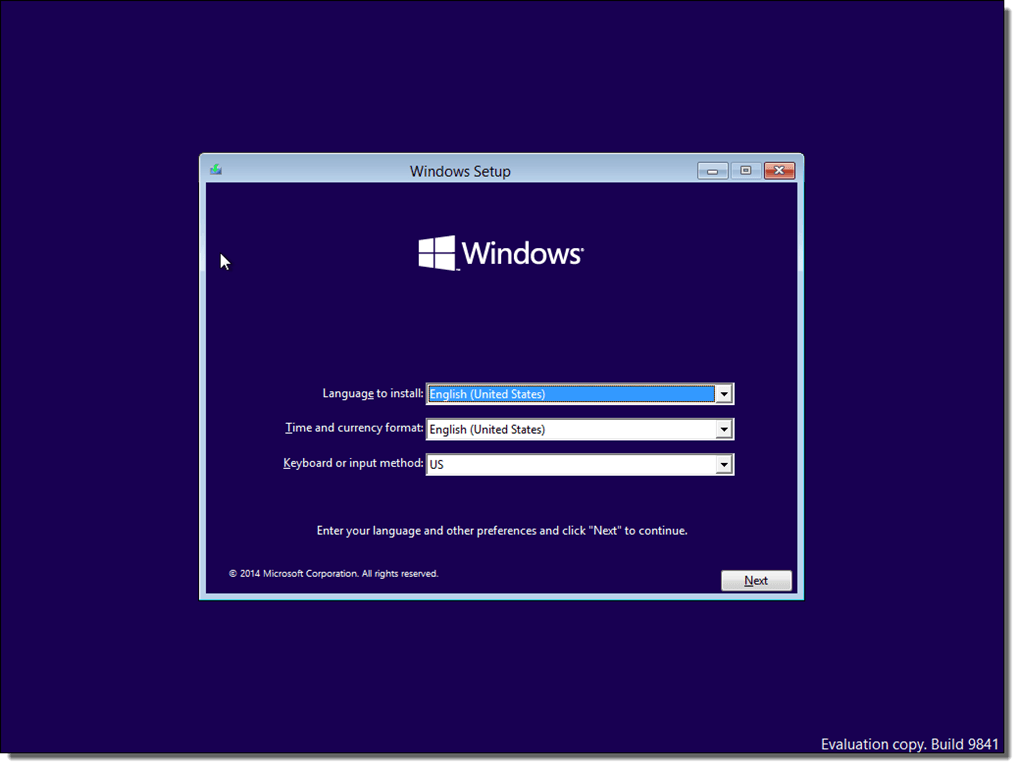
  1. Boot from the Windows 10 DVD. Make sure that your PC setup is configured to boot from a DVD and that UEFI and Secure Boot are disabled.
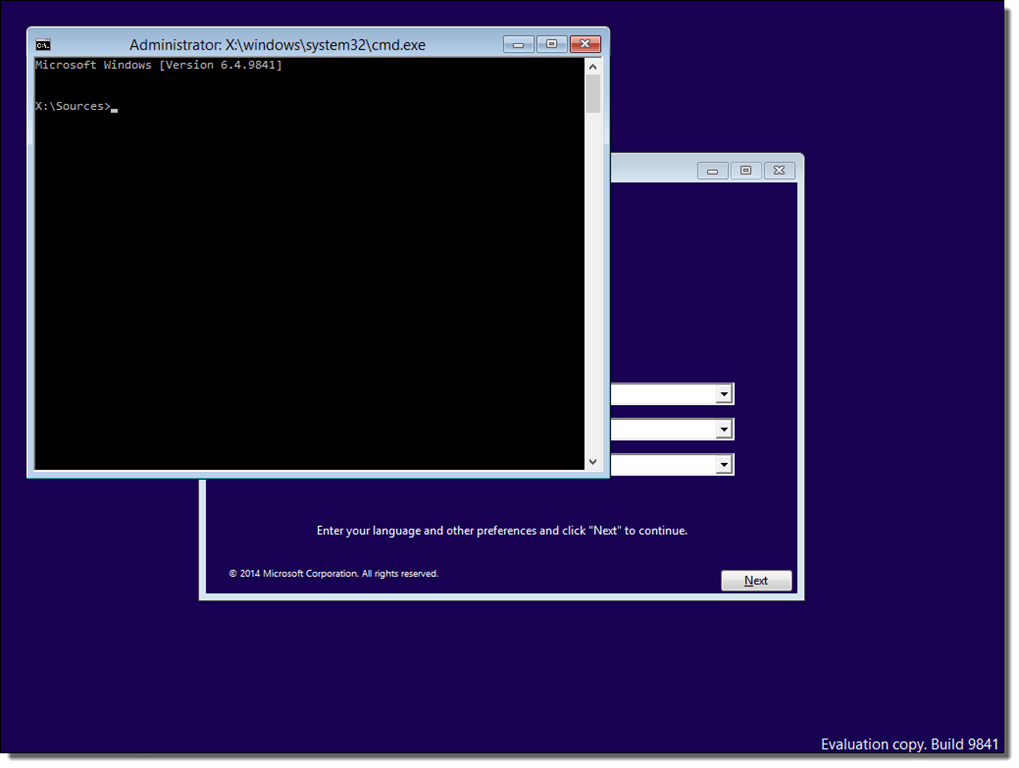
    pswd-22. Press SHIFT + F10 to open a command prompt.
    pswd-3

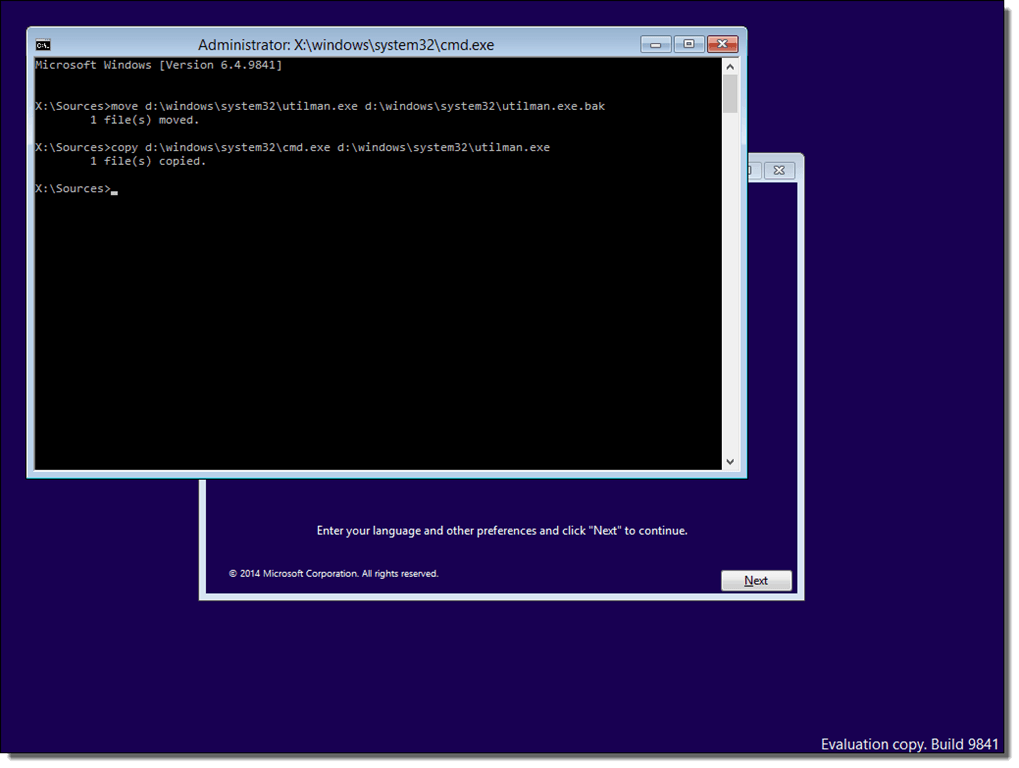
    3. Replace the file utilman.exe with cmd.exe. Before you do this, you should make a copy of utilman.exe so that you can restore it later. Note that you can only restore this file if you boot again from the Windows DVD.

pswd-4
move d:\windows\system32\utilman.exe d:\windows\system32\utilman.exe.bak
copy d:\windows\system32\cmd.exe d:\windows\system32\utilman.exe
Replace utilman.exe with cmd.exe

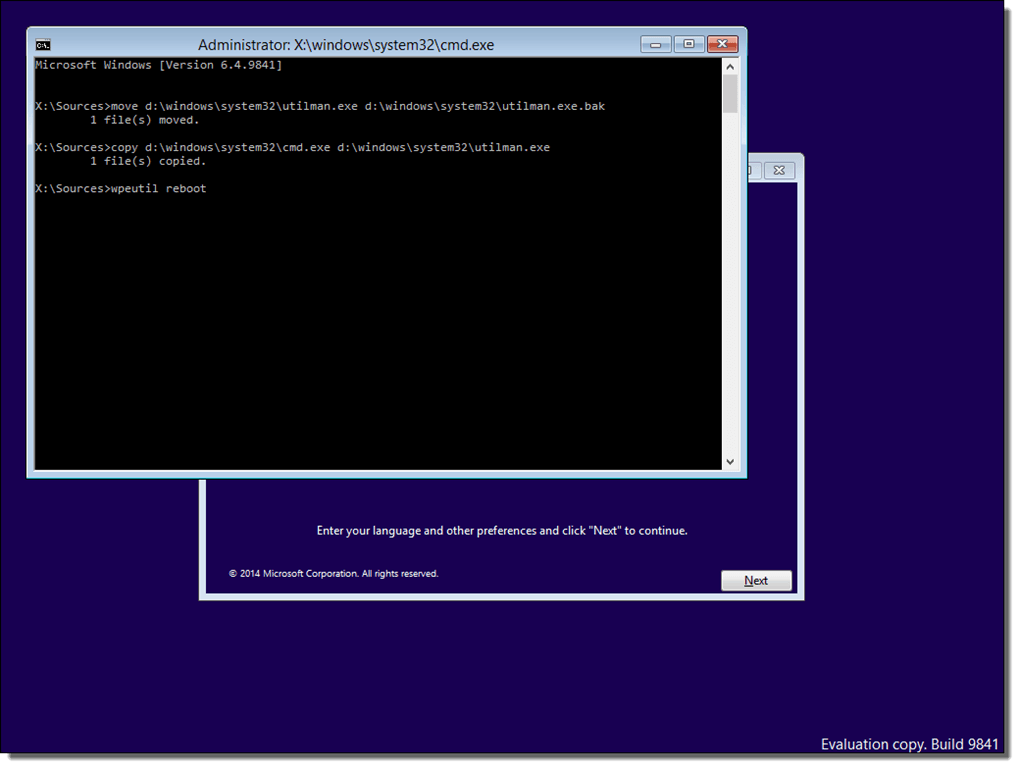
4.  After you have replaced utilman.exe successfully, you can remove the DVD and restart your problematic Windows 10 installation:

pswd-4
wpeutil reboot
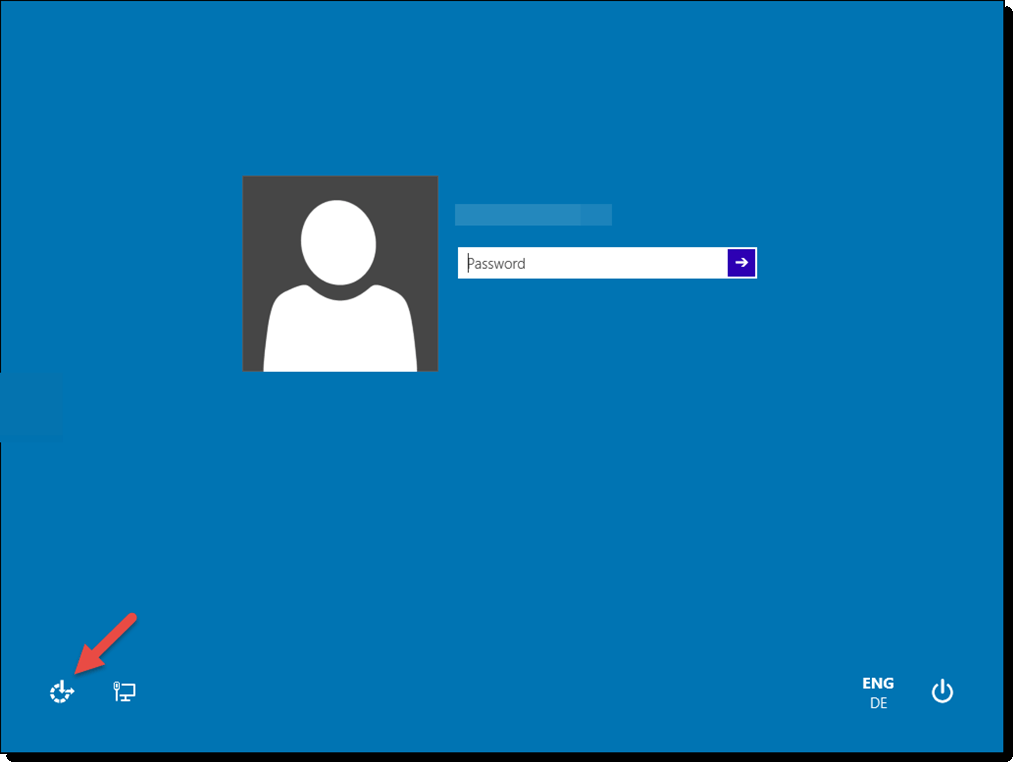
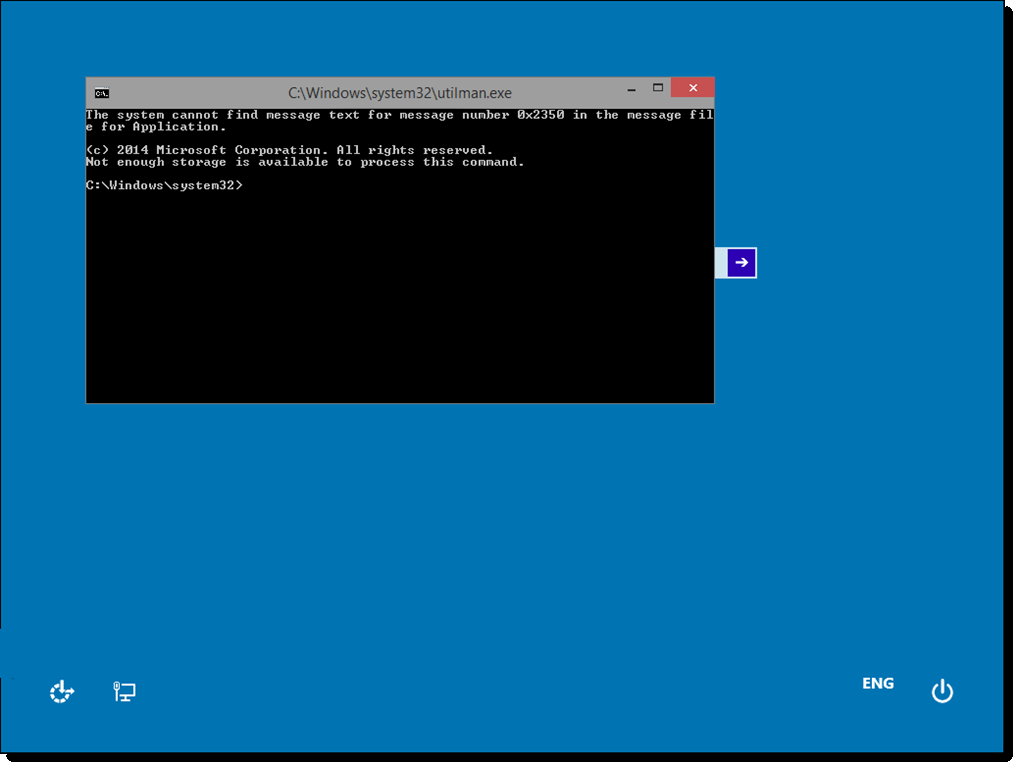
5. On the Windows 10 sign-in page, click the Utility Manager icon.

pswd-5

Since we replaced the Utility Manager with the cmd.exe, a command prompt should open now. Don’t worry about the error message.
pswd-6

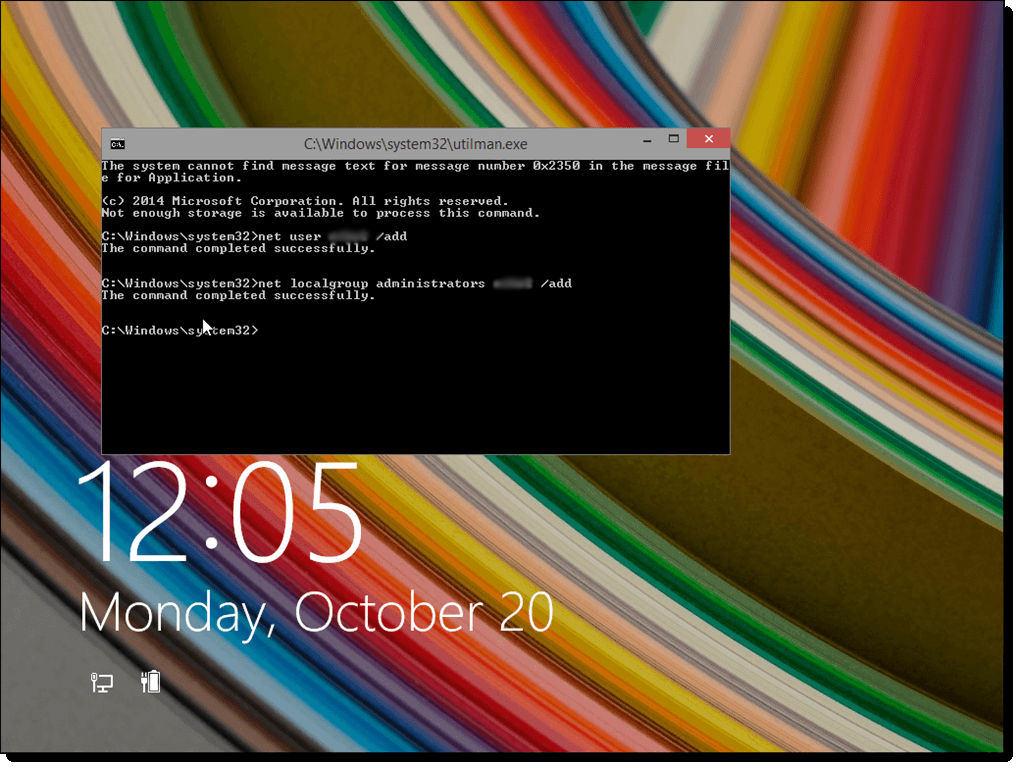
6. You can now add a new user with the command below. We also have to add the user to the administrator group so that we regain full control of our Windows installation. Replace <username> with the account name of your choice. Note that the account name must not exist on this Windows installation. Don’t let the Windows 10 screen saver distract you.
net user <username> /add
net localgroup administrators <username> /add

pswd-7

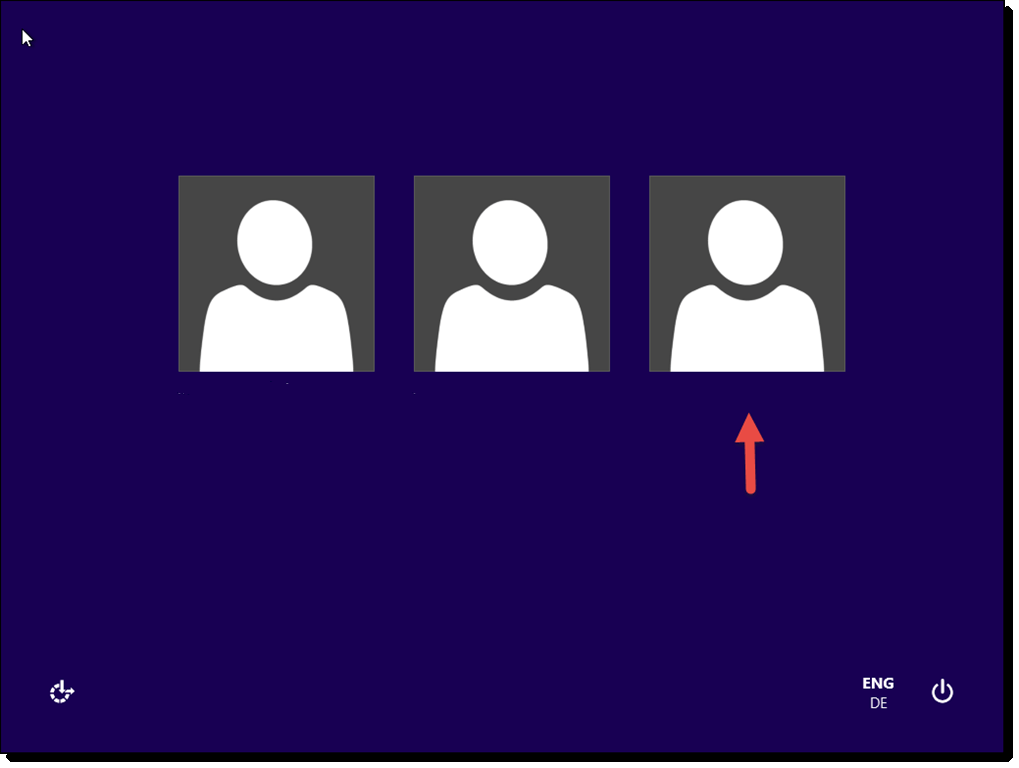
7. Click the screen to make the sign-in page appear again. Your new account should show up, and you can sign in without a password.
pswd-8

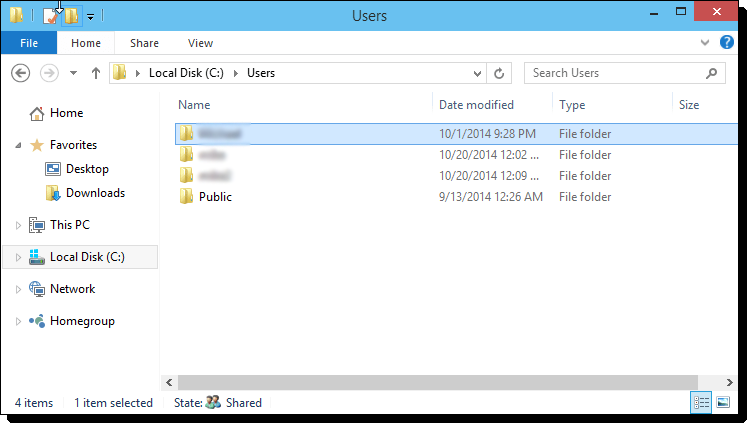
8. You can now access the files associated with your Microsoft account in the C:\Users folder.
pswd-9

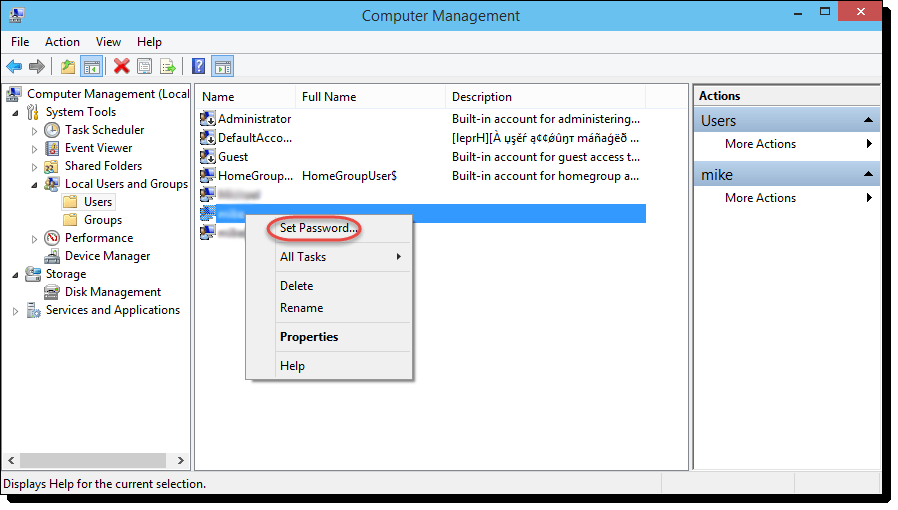
9. If you worked with a local account instead of a Microsoft account, you can reset your password in Computer Management. Right-click the Start button, select Computer Management, and navigate to Local Users and Groups. Right-click your local account and select Set Password.
pswd-10

A shorter way to reset the password of a local account is to replace the first command in step 6 with the following command. (In this case, you don’t need to create a new user.)
net user <username> <password>
Notice that resetting a password with this command doesn’t work with a Microsoft account. The only way to reset a Microsoft account password is through the online forms.

Shrink a VMDK with VMKFSTOOLS

Contents

Purpose

This article gives the steps to shrink a Vmware VMDK virtual disk file from command-line with the Vmware utility vmkfstools. As far as it’s known this is an unsupported method and can defiantly corrupt or break you virtual disk. So, make a backup first and try at your own risk. It worked great for me after I figured it all out. I only had to restore from my backup clone once or twice until I got the steps worked out.

This was performed on ESXi 5.1 and a CentOS 6.3 VM root partition. The VM had three virtual drives. Each dedicated to the three primary volumes (root,boot,swap). Not using LVM. Meaning a separate virtual drive for all three volumes.


Example Configuration

  • ESXi 5.1.0-838463 Host
  • CentOS 6.3 x64 Guest
  • Root partition is 100GB
    • /dev/sdb1
  • 29GB of space is used


Example Goal

  • Reduce root partition to 50GB


STEP 1

Remove All Snapshots on Guest


Backup

  1. Power off the VM Guest
  2. Create a clone of the root virtual drive
    1. SSH to ESX Host
    2. Browse to VM folder
      /vmfs/volumes/datastorename/vmfolder
    vmkfstools -i hostname.vmdk -d thin bak-hostname.vmdk

Icon-Tip-Square-Green.pngIf all the Snapshots are removed general there shouldn’t be any files with 00001 in the name. If there is, most likely something like a backup program has gone wrong and you’ll need to repair the virtual disk/s first.


Shrink Partition

  1. Boot guest off of GParted Live ISO
  2. Select Root drive
  3. Re-size (Shrink) partition to 49GB = 1024 * 49 = 50176
  4. Apply changes
  5. Power Off the VM Guest


Edit VMDK Descriptor

Gnome-sticky-notes-applet If there are snapshots or possibly orphaned snapshots: the VMDK file will appear empty even if you run cat against it. Obviously that will need to be fixed before attempting this unsupported shrink method.

Math

Formula [X * (1024 * 1024 * 1024)] / 512
X = Resulting Size in GB

Example
[50 * (1024 * 1024 * 1024)] / 512 = 104857600

From ESX Host CLI

  1. vi hostname.vmdk
    RW 209715200 VMFS "hostname-flat.vmdk"
    TO
    RW 104857600 VMFS "hostname-flat.vmdk"
  2. Save and Quit
    :wq

Icon-Tip-Square-Green.png In this example we’re cutting the drive in half… so the easy math is 209715200 / 2


Clone Edited VMDK

Make a clone of the VMDK that is set to only Read and Write to a different size.

  1. vmkfstools -i hostname.vmdk -d thin shrunk-hostname.vmdk

Gnome-sticky-notes-applet In this example when cloning it will stop at 50% during the clone because our new VMDK is half the size of the original.


Swap VMDK Files

Replace new shrunk VMDK for the original one.

  1. vmkfstools -E hostname.vmdk original-hostname.vmdk
  2. vmkfstools -E shrunk-hostname.vmdk hostname.vmdk


Extent Partition to End

  1. Boot guest off of GParted Live ISO
  2. Select Root drive
  3. Re-size (Grow) partition to entire 50GB virtual drive
    1. Absorb 1GB unallocated space at end
  4. Apply changes
  5. Exit Gparted | Eject ISO | Reboot


Test

  • Boot OS and test
  • Remove back and original cloned VMDK files
    • vmkfstools -U bak-hostname.vmdk
    • vmkfstools -U original-hostname.vmdk


Remove and Re-Add to Inventory

Lastly if all is well then remove the virtual machine from the ESX host inventory and add it back to correct the GUI readout of the size. Plus, fix it so if you wanted to use the GUI later to grow it.

  1. Power Off VM
  2. Login to with ViClient
  3. Right-Click on Guest
  4. Select Remove from Inventory
  5. Browse Datastore to virtual machine folder
  6. Right-Click on hostname.vmx
  7. Select Add to Inventory
  8. Follow prompts


Windows

The same steps can be used to shrink a Windows drive. With Vista/2008 and newer the disk manager can be used to change the size of the partitions instead of Gparted or Gparted can be used as well.


Related Articles

(HowTo) Grow a VMDK with VMKFSTOOLS
(HowTo) Convert a VMDK from Thick to Thin on ESX\

Many thanks to the person who wrote this article

Network Utility in OS X 10.9 Mavericks

In OS X 10.9 Mavericks the very useful Network Utility app has been moved from its previous location in //Utilities to /System/Library/CoreServices/Applications. You can activate it by navigating to that folder and simply opening it as normal.

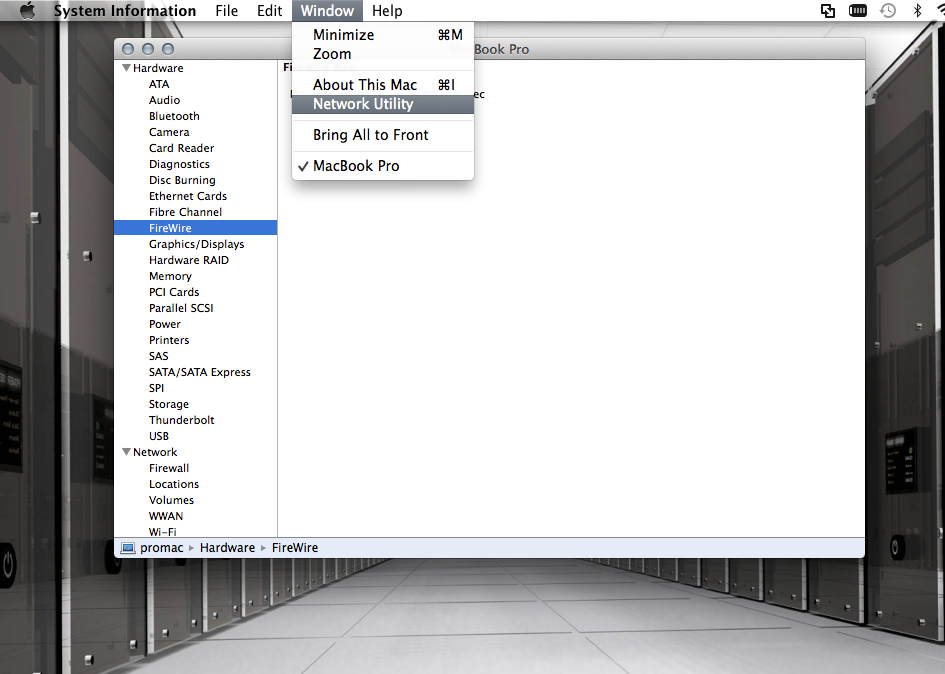
There is also another way to activate Network Utility. Simply open up the ‘System Information’ app, which can still be found in Applications/Utilities, then in the menus at the top of the screen open up the ‘Window’ menu and select ‘Network Utility’.


mavnetutil-1024x753

Upgrade OS X
Macs know how to take care of themselves. Having the latestversion of OS X is good practice. Don’t think of it as adding morejunk to your Mac. Think of it as new software that makes your Mac
run more smoothly. So, the first step in speeding up your Mac is,naturally, to update your Mac. OS X Mavericks has just been released. It should definitely help you add some speed to your Mac. If you’d like to learn how to install OS X Mavericks, take a look at our article on how to do so.
OS X running slow
Manage Startup
Get your Mac up and running with a clean start. Imagine that you start running a race with an 80-pound backpack. It’s going to take you a bit longer to get moving, right? Lighten the load on you Mac. Get a fast Mac startup by removing unnecessary apps. Go to your System Preferences > Users & Groups, and then click on your username. Now click on Login Items and check the box of each program you don’t immediately need when your Mac starts up. This should help out a ton. Now, we’re two steps closer to a newer, faster Mac. mac Startup speed up
Activity Monitor
One of the easiest ways to take back control of your slow Mac is to check your Activity Monitor. Quitting a single app could make a huge difference in speeding up your slow Mac. Open up your Applications folder and then your Utilities folder. Here you’ll find the Activity Monitor, open it. Check out the list of apps and processes that are going on inside your Mac. Pretty complex, eh? We want to find out what’s causing your Mac trouble. Click on the %CPU filter at the top of the list. This sorts the programs by the amount of space they’re taking up on your Mac RAM. The higher the number, the harder you can grind your teeth at that app. Remove, for example, iTunes or maybe Safari (especially if you’re
using Chrome) by clicking on the app from the list and then clicking Quit Process, located at the top-left corner of the window. Don’t remove anything you don’t know, or, if you do, make sure to look up what it is that you’re removing before doing so.
mac Activity Monitor speed up
Hardware Upgrade
So, you’ve tried the above and you still want to make your slow Mac faster? Look into upgrading your hardware. Unfortunately, this can be a bit pricey and some Macs are beyond help (kidding; some just can’t be upgraded). Check out this guide that discusses diagnosing your Mac and what is available in terms of hardware upgrades. Cost and time will be a major factor in deciding if this is the way to go. It should be noted that this might just be the best way to fix your slow Mac. mac Hardware Upgrade
Hard Drive Cleanup
The most well-rounded option for Mac users is to clean out your hard drive. The problem is knowing what files to delete and how to completely remove them from your Mac. The best way to do this? CleanMyMac 2. CleanMyMac 2 takes the guesswork out of cleaning. It gives your Mac a complete scrub down by removing apps, data, and other unnecessary junk. With its Automatic Cleanup function, you can clean your Mac in just two clicks; click to scan, click to remove. Done. It removes caches, logs, language packs, and more to help speed up your Mac.

The Best Cleaner for Mac: CleanMyMac 2

Download for Free


mac Hard Drive Cleanup and speed up

Extend System Volume Error ‘The parameter is incorrect’

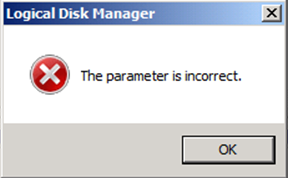
I had an issue when extending the volume of a Windows Server 2008 system drive where it returned the horrible looking error below ‘The parameter is incorrect’.

DiskGrowParameterIncorrect

This leaves you in a scenario where the Disk Management tool reports that the disk has been increased to the new size, but viewing the disk properties in Explorer shows it has not been increased.

DiskSizeMisMatch1

It turns out this has been an issue within Windows Server for sometime and this Microsoft KB article details how to resolve it with the Diskpart utility, essentially the disk partition has been increased, but not the file system size.

It’s as simple as

DISKPART

DISKPART> select volume #

where # is the number of the affected volume which can be found with list volume.

DISKPART> extend filesystem

Now the file system size should match the new partition size.

VMware Vsphere 4.1 client – error -> This product can only be installed on Windows XP SP2 and Above

You will find that the VMware Vsphere 4.1 client will throw the error “This product can only be installed on Windows XP SP2 and Above.” when attempting to install it from your VMware server. Follow these steps to resolve the issue and allow the installation to continue.

1.

Download the Installer

You can download the installer from your VMware host or through vmware.com. You can download the latest version (5.1 as of this writing) but it will still connect to your 4.1 host to download the 4.1 version. When it does, select the option to save it to a folder.

2.

Download 7ZIP from 7-ZIP.ORG

Download 7zip from 7-zip.org. You will need this program to extract the actual installer file from the “VMware-viclient-all-4.1.0-258902-v4.1” archive that you get from the VMware web site or your local host.

3.

Extract the Installer Files with 7ZIP

Right click on “VMware-viclient-all-4.1.0-258902-v4.1” file and under the 7zip menu chose “Extract Here”

4.

Set the Installer to Windows 7 Compatibility Mode

In the “Bin” Directory is the actual installer. Right click “VMware-Client” and select properties and select the compatibility tab. Check “Run this program in compatibility mode for:” and scroll down to Windows 7. Select OK.

5.

Run “VMware-Client” as Administrator

Right click on “VMware-Client” and run as Administrator. The installation should succeed and the correct 4.1 should load either stand alone or as launched from a newer version of the client.

Fix Double click IE desktop icon creates shortcut

Remove the bad IE icon from desktop, either delete or right click desktop -> Properties->Desktop->customize desktop-> uncheck Internet Explorer

Go to http://www.kellys-korner-xp.com/regs_edits/ie_fix.reg – Restore IE Desktop Shortcut Icon Functions

Download that.

Open registry, go to HKEY_CLASSES_ROOT\CLSID\{871C5380-42A0-1069-A2EA-08002B30309D}

Delete that key {871C5380-42A0-1069-A2EA-08002B30309D} + all sub keys

Go to HKEY_CURRENT_USER\Software\Microsoft\Windows\CurrentVersion\Explorer\CLSID\{871C5380-42A0-1069-A2EA-08002B30309D}

Delete that key {871C5380-42A0-1069-A2EA-08002B30309D} + all sub keys

Merge that registry script into registry.

Last, right click desktop -> Properties->Desktop->customize desktop-> check Internet Explorer hit ok, and ok

Should be all set

Mac OSX Stuck At Boot with Spinning Wheel: PERMISSIONS ERROR, esp. ACL

Symptoms:

Your Mac is stuck at boot time. You’ve got a spinning wheel and it just sits there.

Maybe you remember messing about with permissions recently? Perhaps ACLs?

You can screw it up all sorts of ways – maybe you were messing about with chown or chmod, or maybe you did the big dumb and propagated across your boot volume using the OSX Server tools.

Here is the answer: first, find a terminal window or COMMAND-S boot into Single User Mode & mount. Then get into root by typing “su”. If you don’t know the password, then type “sudo passwd” enter your password, and then it will prompt you to set the root password. THEN:

“chmod -R -N /Volumes”

Removes all ACLs from everything.

now it works!!!


Heres the orginial post:


Fire up in Verbose Mode (APPLE KEY + V) and you will see

BootCacheControlUnable to open /var/db/BootCache.playlist

and

launch_msg(): Socket is not connected

Looking inside the folfer at /var/db reveals there is indeed no BootCache Playlist. What is a BootCache Playlist anyways?

Mac OS X uses a boot-time optimization (effectively a smart read-ahead) that monitors the pattern of incoming read requests to a block device (the boot disk), and sorts the pattern into a “playlist”, which is used to cluster reads into a private cache. This “boot cache” is then used for satisfying incoming read requests, if possible. The scheme also measures the cache hit rate, and stores the request pattern into a “history list” for being adaptive in future. If the hit rate is too low, the caching is disabled.

The loadable (sorted) read pattern is stored in/var/db/BootCache.playlist. Once this pattern is loaded, the cache comes into effect. The entire process is invisible from users.

This feature is only supported on the root device. Further, it requires at least128 MB of physical RAM before it is enabled (automatically).

/System/Library/Extensions/BootCache.kext is the location of the kernel extension implementing the cache whileContents/Resources/BootCacheControl within that directory is the user-level control utility (it lets you load the playlist, among other things)

BootCache is started (via BootCacheControl, the control utility) in/etc/rc, and a prefetch tag is inserted (unless the system is booting in safe mode).

/etc/rc looks for BootCacheControl in the Resources directory of theBootCache.kext bundle, as well as in /usr/sbin, and finds it in the former (but it doesn’t exist in the latter)


1) I tried to repair the filesystem with fsck. Nothing is wrong though

2)  I got advice to run:

/System/Library/Frameworks/CoreServices.framework/Versions/A/Frameworks/LaunchS ervices.framework/Versions/A/Support/lsregister -kill -r -domain local -domain system -domain user

to reset the Launch Services database, but that doesn’t seem to do anything (and I’m not sure what that does in first place).

3) Logged in by holding Option and selecting Recovery drive. Disk Utility -> verify/repair permissions. verify/repair file system. To no avail.

4) Tried a few things using hte BootCacheControl command, like tag, mount, and

bootcachecontrol -f /var/db/bootcache.playlist generate /dev/rdisk0s2

Nothing. tried to start with -f /var/.. and it gave the same startup error, file now found, so I tried to “touch /var/db/bootcache.playlist” and got an improper header error when attempting to
SBS 2003 has lost its CAL’s (Client Access Licenses reset to 5)

Problem

Been a while since I’ve seen this one, and strangely I didn’t document it. so when I was asked this morning I searched here on PeteNetLive, and In my personal database of solutions but the cupboard was bare.

Solution

1. Before you do anything make sure your SBS has plenty of space on the hard drive, simply running out of room on the system drive can cause SBS to lose its licences, make sure this is not your problem.

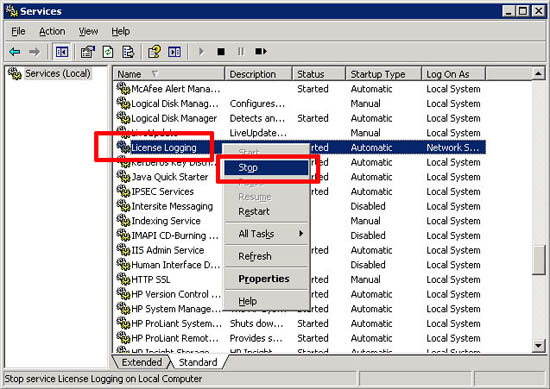
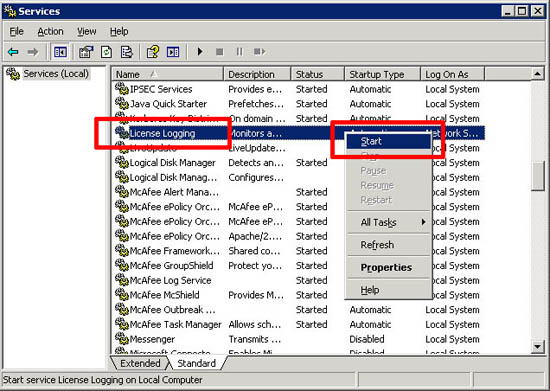
2. If you have plenty of room, then click Start > Run > services.msc {enter}. Locate the Licence Logging service > Right Click > Stop.

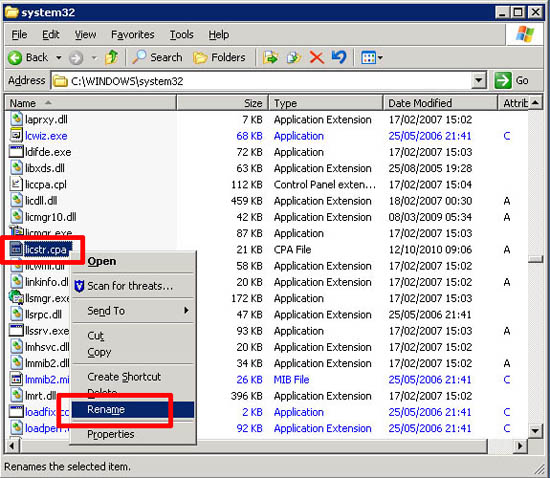
3. Locate the licstr.cpa file (it’s in C:\windows\system32 by default) > Rename it to licstr.OLD.

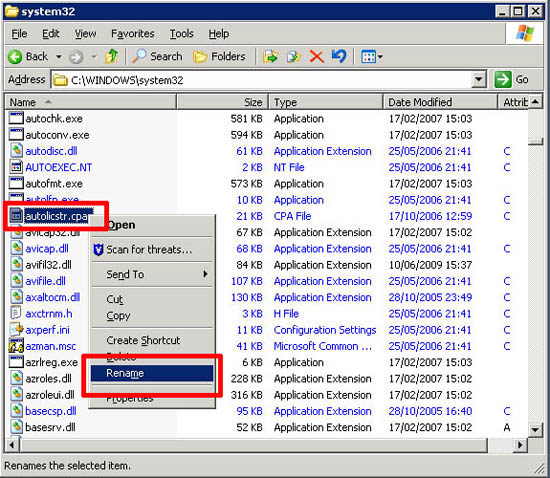
4. Locate the autolicstr.cpa (Should be in the same folder) and COPY it to your desktop to create a backup, Then rename the original to licstr.cpa

5. Back in the services console restart the “Licence Logging Service”.

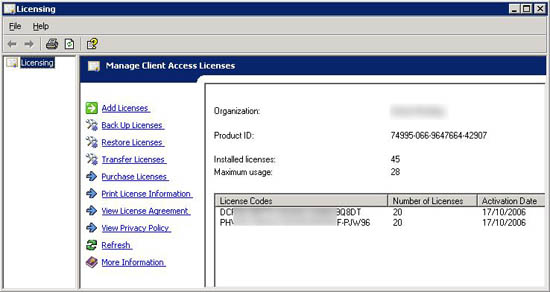
6. Your licences should now be back in place.

7. Finally, you will notice there’s an option in the Licensing console to back up your licences,now would be a good time, to avoid having to do this again.